♥ Labels ♥
- Tutorials (36)
- Animations (29)
- St Patricks Day (6)
- Templates (5)
- Valentines (4)
- Easter (3)
♥Chit Chat♥
♥Favorite Scraps♥
♥PSP Stuff♥
Wednesday, February 08, 2012
Wanna Play DOCTOR?


I'm using the fantastic work of Elias Chatzoudis.
I love his work, and he is one of the few artist that allow animation.
Thank you Elias!
You must have a license and purchase the tube to use his work.
You can grab this tube "Get Well".
I used no plugins outside of the PSP 9 program.
Font used is Base 4
I am going to omit the blinking eye on this tut.
(Tut on blinking is coming soon)
In psp 9, I used the warp brush, noise and texture-blinds.
Open PSP and Animation Shop.
In PSP, open a new white image, 580 x 230
( or whatever forum style tag size you'd prefer)
Add a new raster, flood fill with a gradient made from 2 colors of the tube.
Add a new layer, flood fill with black.
Select- Select all- Select- Modify-Contract by 6
This is your frame layer. Rename it F
Highlight the gradient layer.
Blur- Gaus blur @5
Copy and paste the smaller tube as a new layer.
Duplicate and mirror one of the tubes.
Place them on the left side.
Change blend modes - to multiply
Add a new layer, or copy and paste an image as texture,
Apply , change the blend mode to overlay-softlight or screen
* this step can be skipped if you're not familiar with using textures*
Copy and paste LARGE tube as a new layer.
Place this off to the right side.
Change opac to 50 or 60
White color in your background palette
X out the foreground palette
Using your preshape tool- rectangle, draw out 2 thin rectangles, from one side to the other.
Convert these to raster layers
( these are the bands the text goes on)
These rename to band 1 & band 2
Effects- Texture - Blinds
Width = 3, Opac =25, check beside light from top
Color is red
Change blend mode to soft light.
With your selection tool, rectangle, draw a frame of dots along the inside of the frames.
This is how your layers should look.
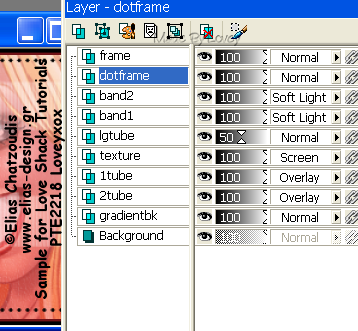
Add text.
On top of band 1- wanna play
On top of band 2 - DOCTOR?
Add CR and Name.
Go back to your LARGE tube layer that is placed on the RIGHT side.
Using your freehand selection tool, draw around the outside of the needle.
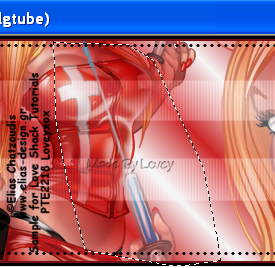
Ants marching, hit delete key, selections- select none.
Ok this is how your layers should look now,
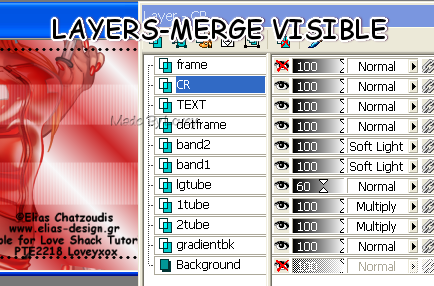
X OUT the layers as shown above,
Layers- Merge Visible.
Rename that layer BASE
Copy and paste your Main tube as a new layer, above the base layer.
Place her beside the large tube on the right.
Highlight the base layer, select- select all-
Highlight the tube layer, select- invert- hit delete key.
Selection - select none
Highlight the frame layer.
Duplicate that layer 2 x's
Rename- f1- f2- f3
Apply noise to each of those layers, change the amount each time.
X OUT F2- F3 as shown below
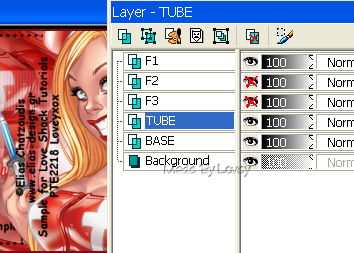
Edit- Copy merged
Over to Animation Shop
Edit - paste as a new animation.
Back to PSP
Xout F1- UnX F2
Highlight main tube layer.
Using the warp brush with these settings,
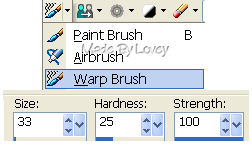
Begin to move the tube as shown below,

Just warp a tiny bit, moving the bottom of the needle & thumb up
and the fingers and top of plunger down.
Edit- Copy merged, Over to AS, paste after current frame.
View the animation to see if you like it, if not, undo the paste,
back in PSP undo the warp,and redo the movement till you like it.
If you like how it's moving, go back to PSP, Edit, undo all the warp,
X out F2, Un X F3
Edit, copy merged, Over in AS, paste after current layer.
You now have 3 frames in AS.
Edit - Select All- Animation - Frame Props- Change speed to 15.
Save
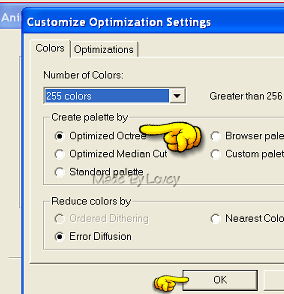
Make sure when your saving, you check the optimizing to see if it might be better on octree or median cut
save as a .gif
Now go back to PSP and make an avatar to match!
Hope you enjoyed this tut and warping!!
Happy PSPing!!

Tut written by © Lovey'12 February 8,2012
Any resemblance to any other tut is purely coincidence
Proud Member of TWI
Subscribe to:
Post Comments (Atom)


0 comments:
Post a Comment