Tuesday, November 30, 2010
More Animations :o)
Hiya Friends,
I have a few more animations for you today.
You can grab them below
Download
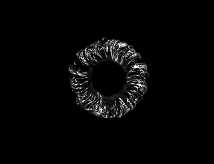
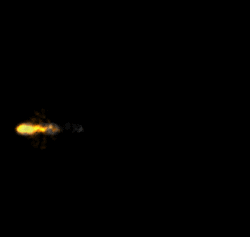
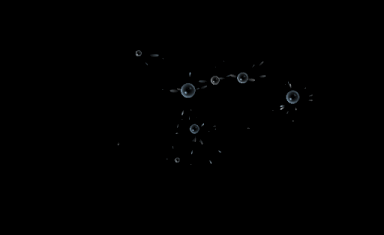
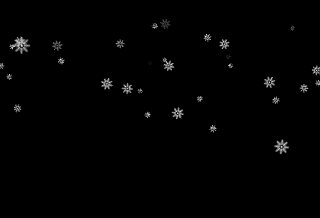
Here's some previews.


Like everyone else in the PSP world, I too, deserve credit for my ideas, creations and shares.
Regardless if you color and/or cull my animations
they are still to be credited to me,with your disclaimer that you have altered them.
Without MY finished product you would not have the animation you are coloring/culling for your tuts/use.
Please respect my TOU as I do yours.
♥Lovey's TOU♥
Do not claim as your own.
Do not rip apart and claim as your own.
Do not copy.
For Tut writers:
You may use them in tutorials but please keep credit layer attached and give proper credit.
You may cull/color the animation,but please give proper credit and disclaimer that you have altered it.
Thank you!
Enjoy!!
Happy PSPing!!

I have a few more animations for you today.
You can grab them below
Download
Here's some previews.
Like everyone else in the PSP world, I too, deserve credit for my ideas, creations and shares.
Regardless if you color and/or cull my animations
they are still to be credited to me,with your disclaimer that you have altered them.
Without MY finished product you would not have the animation you are coloring/culling for your tuts/use.
Please respect my TOU as I do yours.
♥Lovey's TOU♥
Do not claim as your own.
Do not rip apart and claim as your own.
Do not copy.
For Tut writers:
You may use them in tutorials but please keep credit layer attached and give proper credit.
You may cull/color the animation,but please give proper credit and disclaimer that you have altered it.
Thank you!
Enjoy!!
Happy PSPing!!

Monday, November 29, 2010
Easy Coloring of Animations-Temps etc...
tutHere's a really easy way to colorize .mng animations and templates.
This method can be used for many things in psp.
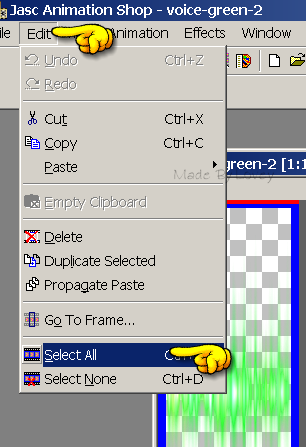
Open the mng or pspimage animation in Animation Shop.
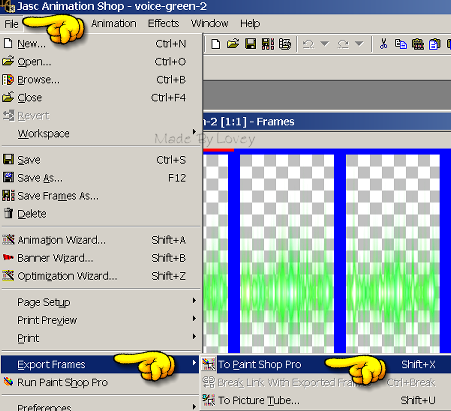
Go to Edit.... Select all... File.
Export to PSP.
All the frames in the animation will open in your psp program.
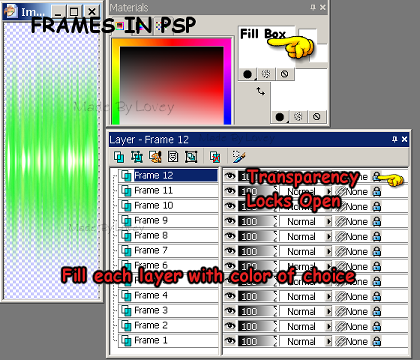
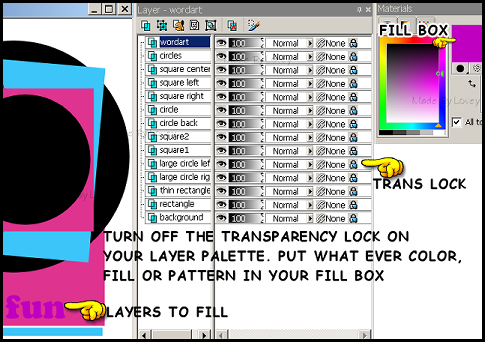
Uncheck the transparent lock on each frame.
(far right side on layer palette)
Put your choice of color in your fill box.
Fill each layer.
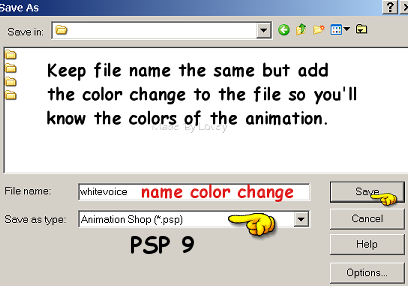
Save as animation shop file.
See SShots below:
When filling templates, with colors-gradients or patterns
Follow the same method:
Shown below.
Hope you find these methods helpful.
Happy PSPing!
This method can be used for many things in psp.
Open the mng or pspimage animation in Animation Shop.
Go to Edit.... Select all... File.
Export to PSP.
All the frames in the animation will open in your psp program.
Uncheck the transparent lock on each frame.
(far right side on layer palette)
Put your choice of color in your fill box.
Fill each layer.
Save as animation shop file.
See SShots below:
When filling templates, with colors-gradients or patterns
Follow the same method:
Shown below.
Hope you find these methods helpful.
Happy PSPing!
Wednesday, November 24, 2010
A Few Animations
I'm still cleaning out folders :o)
Trying to make room for new projects.
Here's a few more animations I made.
Download
There's more in the folder than in previews.


Like everyone else in the PSP world, I too, deserve credit for my ideas, creations and shares.
Please respect my TOU as I do yours.
♥Lovey's TOU♥
Do not claim as your own.
Do not rip apart and claim as your own.
Do not copy.
You may use them in tutorials but please keep credit layer attached and give proper credit.
Thank you!
Enjoy!!
Happy PSPing!
Trying to make room for new projects.
Here's a few more animations I made.
Download
There's more in the folder than in previews.

Like everyone else in the PSP world, I too, deserve credit for my ideas, creations and shares.
Please respect my TOU as I do yours.
♥Lovey's TOU♥
Do not claim as your own.
Do not rip apart and claim as your own.
Do not copy.
You may use them in tutorials but please keep credit layer attached and give proper credit.
Thank you!
Enjoy!!
Happy PSPing!
Monday, November 22, 2010
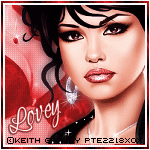
SnowFlake Friends Tut
After much consideration and coaxing from friends I've decided to write tuts again, along with share animations I make.
This week I am a guest tut writer on Daph's tutorials.
My Pink Ice Forum Set tut has been posted.


Check it out!!
DAPH'S TUTORIALS
Here's another winter Forum Set Tutorial.
This is a tut for beginners and advanced PSPers.
Supplies:
I'm working in PSP 9 and Animation Shop 3.
VanDeeLee Snowflake
Download
Unzip and place this where you keep your plugins.
Tubes of choice.
I am using the fantastic art by TOOSHTOOSH.
Adorable tubes thanks TooshToosh!!
Do not use these tubes without a license.
You can purchase tubes
HERE
Fonts of choice.
Alien Skin Constellation or PSP noise for frames.
Ok let's get started!
Open 150x150 new white image for avatar, and 575x250 new white for siggy.
Leave the avatar for now,we're going to do the sig first.
If you're using the tubes from Toosh, copy and paste the snow background onto your 575 x 250 image.
Place it around so the snow line is about middle in the canvas.Then snap crop.
Rename that layer PP1.
Select 2 colors from your tubes and put them in your color palette.
I have used #19477e and e1f5ff in my color palette.
Selections-Select all- Float- Defloat- add a new raster ABOVE pp1. Flood fill it with a color from your tube.
Selections-Modify-Contract by 8- Delete
Select- none.
Name this layer fra2
Click onto your gradient tab in color palette.
Foreground gradient.
Settings: Angle @45, Repeats 13, Style linear.
Activate PP1 layer, selections, select all, float, defloat, add a new raster ABOVE fra2,
flood fill with gradient.
Selections-Modify-Contract by 6-Delete
Select none.
Name this layer gradfra.
Activate PP1 layer,selections, select all, float, defloat, add a new raster ABOVE gradfra,
flood fill with solid color.
Selections-Modify-Contract by 3-Delete
Select none.
Name this layer fra1
OK those are your frames around the siggy.
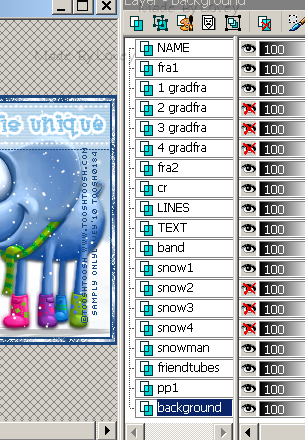
Your layer palatte should look like this:
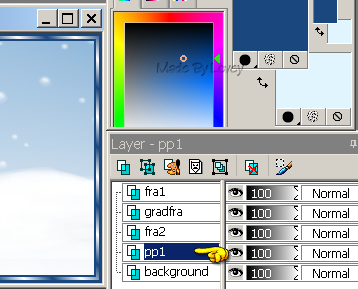
Activate the pp1 layer.
We're going to build on that layer.
I added all tubes except the snowman.
I will add that tube later.
Copy and paste your tubes around on the pp1 layer.
Place them to your liking.
Once happy with them,X out other layers,
and merge tubes visible.
Duplicate the tubes 1 time.
On the original tubes, adjust-blur-average-@7
click OK
Change blend mode to multiply.
Add drop shadow to copy tube layer.
Merge those 2 layers together visible.
Rename that layer to friends.
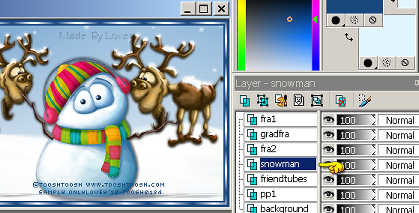
Copy and paste the snowman tube above friends layer.
The reason I didn't add my snowman along with the other tubes, is I was thinking of animating it, but I'll save that for another time:o)
Add drop shadow.
Add your CR info as a vector, place it,
then convert to a raster.
Activate the snowman layer.
Grab your preshape tool-rectangle
Palette=background white-foreground null.
Draw out a rectangle from side to side.
Effects-texture-blinds- both colors in box
same as solid color used in the frames.
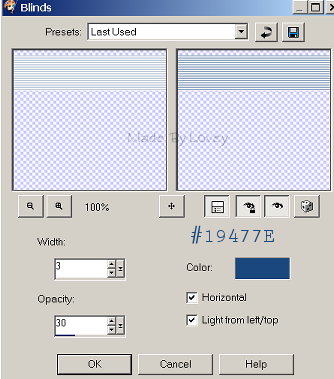
Change blend mode to soft light.
Rename layer Band.
Pick a font.
I used Frosty color #19477e
Size 14, Kern@30 Sharp.Vector.
Add words across the band.
I added
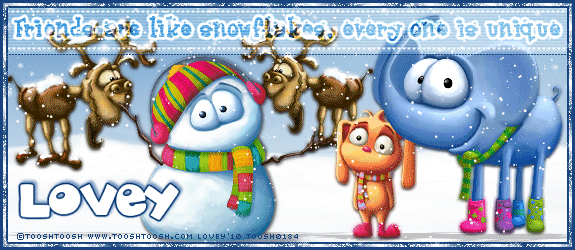
FRIENDS ARE LIKE SNOWFLAKES EVERY ONE IS UNIQUE
When happy, convert layer to a raster.
Add eye candy glow if you'd like
and a drop shadow.
Change blend mode to overlay.
With your pen tool. Line dot-Width 2
Polylines,draw some lines across the band
outside of text.
Convert that to a raster layer.
Rename layer Lines
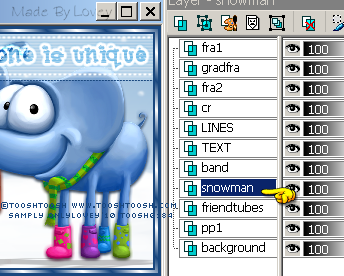
Activate Snowman layer.
Add 4 new raster layers above the snowman.
Rename those layers:
Snow 1- Snow 2-
Snow 3- Snow 4.
Activate Snow 1 layer.
Effects-Plugins-VDL Adrenline-Snowflakes.
Apply these settings to that layer.
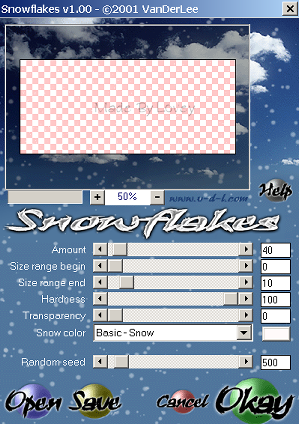
Snow 2 layer change the random seed to 1000
Snow 3 layer change the random seed to 2000
Snow 4 layer change the random seed to 3000
X out snow 2-3-4 layers on your layer palette.
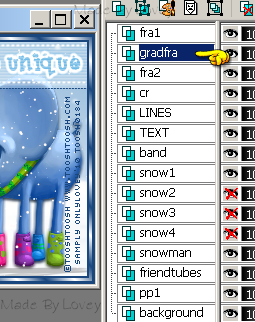
Activate the gradfra layer.
Duplicate that layer 3 x's total of 4 grad frames.
I used Constellation on these frames, but if you don't have that plugin PSP noise adds glitter.
You can use that if you'd like.
Just change the noise settings for each frame.
Constellation settings for Gradfra1
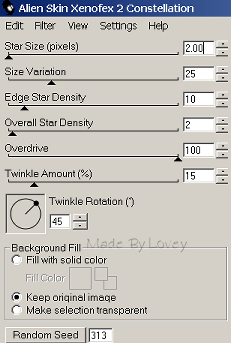
Gradfra2 click random seed once
Gradfra3 click random seed once
Gradfra4 click random seed once.
X Out Gradfra 2-3-4
Activate top layer and add your name.
I used font akadylanplain.
White with glow color #19477e
Drop Shadow.
This is how your layer palette should look.
Let's put it together in Animation Shop.
Edit copy merged, paste into AS as a new animation.
Back to psp UnX layers 2- XOut layers 1, edit, copy merged, paste into AS after current frame.
PSP, UnX layers 3- XOut layers 2, edit, copy merged,paste into AS after current frame.
Back to PSP, UnX layers 4, XOut layers 3,edit, copy merged,paste into AS after current frame.
In animation shop you have 4 frames.
Edit, select all,Animation, frame properties @16
View animation,if you like, save as a .gif
Back to psp.
Carry on to make the avatar if you'd like.
Use the same methods as above for the snow and frames.
Hope you had fun.
Happy PSPing!!
This week I am a guest tut writer on Daph's tutorials.
My Pink Ice Forum Set tut has been posted.
Check it out!!
DAPH'S TUTORIALS
Here's another winter Forum Set Tutorial.
This is a tut for beginners and advanced PSPers.
Supplies:
I'm working in PSP 9 and Animation Shop 3.
VanDeeLee Snowflake
Download
Unzip and place this where you keep your plugins.
Tubes of choice.
I am using the fantastic art by TOOSHTOOSH.
Adorable tubes thanks TooshToosh!!
Do not use these tubes without a license.
You can purchase tubes
HERE
Fonts of choice.
Alien Skin Constellation or PSP noise for frames.
Ok let's get started!
Open 150x150 new white image for avatar, and 575x250 new white for siggy.
Leave the avatar for now,we're going to do the sig first.
If you're using the tubes from Toosh, copy and paste the snow background onto your 575 x 250 image.
Place it around so the snow line is about middle in the canvas.Then snap crop.
Rename that layer PP1.
Select 2 colors from your tubes and put them in your color palette.
I have used #19477e and e1f5ff in my color palette.
Selections-Select all- Float- Defloat- add a new raster ABOVE pp1. Flood fill it with a color from your tube.
Selections-Modify-Contract by 8- Delete
Select- none.
Name this layer fra2
Click onto your gradient tab in color palette.
Foreground gradient.
Settings: Angle @45, Repeats 13, Style linear.
Activate PP1 layer, selections, select all, float, defloat, add a new raster ABOVE fra2,
flood fill with gradient.
Selections-Modify-Contract by 6-Delete
Select none.
Name this layer gradfra.
Activate PP1 layer,selections, select all, float, defloat, add a new raster ABOVE gradfra,
flood fill with solid color.
Selections-Modify-Contract by 3-Delete
Select none.
Name this layer fra1
OK those are your frames around the siggy.
Your layer palatte should look like this:
Activate the pp1 layer.
We're going to build on that layer.
I added all tubes except the snowman.
I will add that tube later.
Copy and paste your tubes around on the pp1 layer.
Place them to your liking.
Once happy with them,X out other layers,
and merge tubes visible.
Duplicate the tubes 1 time.
On the original tubes, adjust-blur-average-@7
click OK
Change blend mode to multiply.
Add drop shadow to copy tube layer.
Merge those 2 layers together visible.
Rename that layer to friends.
Copy and paste the snowman tube above friends layer.
The reason I didn't add my snowman along with the other tubes, is I was thinking of animating it, but I'll save that for another time:o)
Add drop shadow.
Add your CR info as a vector, place it,
then convert to a raster.
Activate the snowman layer.
Grab your preshape tool-rectangle
Palette=background white-foreground null.
Draw out a rectangle from side to side.
Effects-texture-blinds- both colors in box
same as solid color used in the frames.
Change blend mode to soft light.
Rename layer Band.
Pick a font.
I used Frosty color #19477e
Size 14, Kern@30 Sharp.Vector.
Add words across the band.
I added
FRIENDS ARE LIKE SNOWFLAKES EVERY ONE IS UNIQUE
When happy, convert layer to a raster.
Add eye candy glow if you'd like
and a drop shadow.
Change blend mode to overlay.
With your pen tool. Line dot-Width 2
Polylines,draw some lines across the band
outside of text.
Convert that to a raster layer.
Rename layer Lines
Activate Snowman layer.
Add 4 new raster layers above the snowman.
Rename those layers:
Snow 1- Snow 2-
Snow 3- Snow 4.
Activate Snow 1 layer.
Effects-Plugins-VDL Adrenline-Snowflakes.
Apply these settings to that layer.
Snow 2 layer change the random seed to 1000
Snow 3 layer change the random seed to 2000
Snow 4 layer change the random seed to 3000
X out snow 2-3-4 layers on your layer palette.
Activate the gradfra layer.
Duplicate that layer 3 x's total of 4 grad frames.
I used Constellation on these frames, but if you don't have that plugin PSP noise adds glitter.
You can use that if you'd like.
Just change the noise settings for each frame.
Constellation settings for Gradfra1
Gradfra2 click random seed once
Gradfra3 click random seed once
Gradfra4 click random seed once.
X Out Gradfra 2-3-4
Activate top layer and add your name.
I used font akadylanplain.
White with glow color #19477e
Drop Shadow.
This is how your layer palette should look.
Let's put it together in Animation Shop.
Edit copy merged, paste into AS as a new animation.
Back to psp UnX layers 2- XOut layers 1, edit, copy merged, paste into AS after current frame.
PSP, UnX layers 3- XOut layers 2, edit, copy merged,paste into AS after current frame.
Back to PSP, UnX layers 4, XOut layers 3,edit, copy merged,paste into AS after current frame.
In animation shop you have 4 frames.
Edit, select all,Animation, frame properties @16
View animation,if you like, save as a .gif
Back to psp.
Carry on to make the avatar if you'd like.
Use the same methods as above for the snow and frames.
Hope you had fun.
Happy PSPing!!
Wednesday, November 17, 2010
Animations
Here's another set of animations I've made.


Download
Like everyone else in the PSP world, I too, deserve credit for my ideas, creations and shares.
Please respect my TOU as I do yours.
♥Lovey's TOU♥
Do not claim as your own.
Do not rip apart and claim as your own.
Do not copy.
You may use them in tutorials but please keep credit layer attached and give proper credit.
Thank you!
Enjoy!!
Happy PSPing!!
Sunday, November 14, 2010
Back with Animations
Hiya everyone!
It's been awhile :o)
I'm hoping to get some tuts up soon.
Till then, here's a share of some animations I've made over the past few months.
Like everyone else in the PSP world, I too, deserve credit for my ideas, creations and shares.
Regardless if you color and/or cull my animations
they are still to be credited to me,with your disclaimer that you have altered them.
Without MY finished product you would not have the animation you are coloring/culling for your tuts/use.
Please respect my TOU as I do yours.
♥Lovey's TOU♥
Do not claim as your own.
Do not rip apart and claim as your own.
Do not copy.
For Tut writers:
You may use them in tutorials but please keep credit layer attached and give proper credit.
You may cull/color the animation,but please give proper credit and disclaimer that you have altered it.
Thank you!
Enjoy!!
The fairy animation below is included in these files.

You'll find it in the Sept'10 folder, file name is
fairy-white3-lovey10
Here's a small preview of what else is in the zip.


You can download them
HERE
Happy PSPing!
It's been awhile :o)
I'm hoping to get some tuts up soon.
Till then, here's a share of some animations I've made over the past few months.
Like everyone else in the PSP world, I too, deserve credit for my ideas, creations and shares.
Regardless if you color and/or cull my animations
they are still to be credited to me,with your disclaimer that you have altered them.
Without MY finished product you would not have the animation you are coloring/culling for your tuts/use.
Please respect my TOU as I do yours.
♥Lovey's TOU♥
Do not claim as your own.
Do not rip apart and claim as your own.
Do not copy.
For Tut writers:
You may use them in tutorials but please keep credit layer attached and give proper credit.
You may cull/color the animation,but please give proper credit and disclaimer that you have altered it.
Thank you!
Enjoy!!
The fairy animation below is included in these files.
You'll find it in the Sept'10 folder, file name is
fairy-white3-lovey10
Here's a small preview of what else is in the zip.
You can download them
HERE
Happy PSPing!
Subscribe to:
Posts (Atom)
♥ Click for my profile ♥
loves2pspxox@aol.com


♥Grab My Blinkie♥

♥Places I Love♥