Tuesday, July 26, 2011
Animations for Today
Howdy friends!!
Here's a few animations I made last week.
I've zipped them into one folder.
Word ani's, skull ani's, and some splats for you.
Download Zip
Here's some previews:


A few weeks ago I made a set ( using the below ani) for my July Always List in Creative Misfits.
Here's that set,
Enjoy!!
Happy PSPing!!

Here's a few animations I made last week.
I've zipped them into one folder.
Word ani's, skull ani's, and some splats for you.
Download Zip
Here's some previews:
A few weeks ago I made a set ( using the below ani) for my July Always List in Creative Misfits.
Here's that set,
Enjoy!!
Happy PSPing!!

Tut Party Girl
Hiya!!
Tut ShoutOut- Party Girl
This awesome new tut has been posted by a friend using some of my animations!
Check it out!!

It's a 3 piece set, here's the forum banner and tag.


Fantastic set Vanessa!!
Happy PSPing!!
Tut ShoutOut- Party Girl
This awesome new tut has been posted by a friend using some of my animations!
Check it out!!
It's a 3 piece set, here's the forum banner and tag.


Fantastic set Vanessa!!
Happy PSPing!!
Saturday, July 23, 2011
Summer Splash Forum Set
Hiya!!
I received this wonderful gift in my mailbox today and I just had to share.
This set was made by Kandi.
Isn't it adorable?!?
She used my lil crabby and bubble animations.
The tutorial for this cutie can be found,

Thank you so very much hon, you know I love it!!
I received this wonderful gift in my mailbox today and I just had to share.
This set was made by Kandi.
Isn't it adorable?!?
She used my lil crabby and bubble animations.
The tutorial for this cutie can be found,
Thank you so very much hon, you know I love it!!
Friday, July 22, 2011
Requested Animations
Hiya,
Here are some animations that have been requested.
I made this set in May for Creative Misfits, using animations I made called meadow and puffs.
Here's how I used them,


I have zipped those 2 animations together,
Download Puffs Zip
Here's the electrical animation that was used in a Creative Misfit challenge last year.

Download Electrical
Last fall I made a set using a falling leaves animation I made.I think I shared it in one of last years zip folders, but I've uploaded it again.

Download Leaves

I shared some Snow last yr, you can find it
HERE
I'll be making more leaves and snow as we go into our fall season.
Enjoy!!
Happy PSPing!!
Here are some animations that have been requested.
I made this set in May for Creative Misfits, using animations I made called meadow and puffs.
Here's how I used them,
I have zipped those 2 animations together,
Download Puffs Zip
Here's the electrical animation that was used in a Creative Misfit challenge last year.
Download Electrical
Last fall I made a set using a falling leaves animation I made.I think I shared it in one of last years zip folders, but I've uploaded it again.
Download Leaves
I shared some Snow last yr, you can find it
HERE
I'll be making more leaves and snow as we go into our fall season.
Enjoy!!
Happy PSPing!!
Thursday, July 21, 2011
Animations for Today
Hiya!!
Dropping off a few animations for you today.
As usual, they are on transparent backs, only the previews have colored backgrounds.
All are included in the zip.
Download Zip
Previews:


Enjoy!!
Happy PSPing!!
Dropping off a few animations for you today.
As usual, they are on transparent backs, only the previews have colored backgrounds.
All are included in the zip.
Download Zip
Previews:
Enjoy!!
Happy PSPing!!
Tag and Forum Templates
Hiya!!
I've made some templates to share.
I have posted a new page, where you can find my forum banner and tag templates.
Look Here
As you can see, templates aren't really my thing LOL, but if you're new to making forum sets, they might help you along the way.
I'm hoping to use them in some upcoming tutorials too.
Happy PSPing!!
Tuesday, July 19, 2011
Animations for Today
Hiya!!!
Here's some animations for today.
All 4 are in the zip.
Download Zip
Previews:

Here's a zip of water ani's.
Download Zip
Previews of what's in the zip.


Enjoy!!
Happy PSPing!!
Here's some animations for today.
All 4 are in the zip.
Download Zip
Previews:
Here's a zip of water ani's.
Download Zip
Previews of what's in the zip.

Enjoy!!
Happy PSPing!!
Saturday, July 09, 2011
Friends R Forum Set

I'm using the amazing art of Suzanne Woolcott,
This is licensed art and must be purchased.
I'm also using a fantastic scrap kit by Tamie at Digital n Dreams
This kit is called "The Uninvited".
Supplies:
Tube
Embellishments - Sparks and or glows
Plugin: Xero - porcelain
Plugin: Xenofex2 - constellation
Fonts: 1BicarbonateDNA and Fontdinerdotcom-sparkly
Supplies made by me - Animation
I am using PSP 9 and Animation Shop
I assume you have a working knowledge of both these programs.
Open PSP and Animation Shop. Open your tubes in PSP and the ani in AS.
Open a new white image 575 x 250
Pick 2 colors from your tube. Put one in the foreground and one in the background on your materials palette.
I am using #584365 and #FAFAF8
Click on your gradient tab. Find the foreground color in gradients.
Angle = 45 , Repeats = 10, check beside invert, linear
Add a new raster to your project. Flood fill with the gradient.
Adjust - Blur - Gaussian blur - 8.00
Rename this layer "gradfill"
Add tube as a new layer. Duplicate and add multiple tubes around the project.
Place them to your liking. Once your happy, X out the background and gradfill layer then merge your tubes visible.
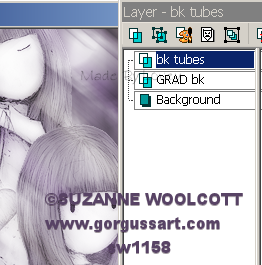
Rename this layer "bktubes".
Duplicate your bktubes layer 2 x's. Total of 3 bktubes layer.
#1 layer ( top layer of these tubes) - Change blend mode to screen
#2 layer- Effects - Plugin - Xero - Porcelain
Settings Below
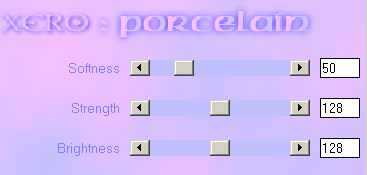
#3 layer ( bottom layer of these tubes) - Adjust - Blur - Motion blur- Angle = 50 , Strength = 100
Duplicate that layer, Image - Mirror
Xout - background, gradfill layers. Merge visible the 3 bktubes layers together.
Change the blend mode to luminance.
This is where I add my tagframe layers, you decide if you'd like to do it now or wait till the end.
Add a new raster layer- Floodfill with one of your colors. Mine is #FAFAF8
Selections - select all - float- selections - defloat- selections- modify - contract by 8, hit your delete key.
Selections - Select none.
Add a new raster.
Open a paper from the scrap kit, I used P2.
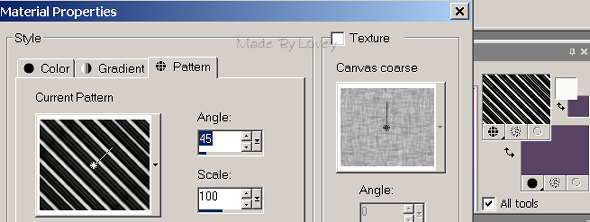
Click on the pattern tab in materials, find the paper and floodfill your new layer.
Selections - select all - float - selections - defloat - selections - modify - contract by 6, hit your delete key.
Selections - Select none.
Add a new raster layer.
Flood fill with the same color used on your first frame layer. Mine is #FAFAF8
Selections - select all - float - selections - defloat - selections - modify - contract by 1, hit delete key.
Selections - Select none.
Rename those layers, beginning at the top, FR1, PaperFR, FR3.
Highlight the bktubes layer.
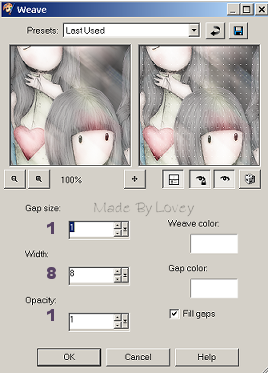
Apply a plugin of your choice, or as I did, Effects- Texture effects - Weave - Gap size =1, Width = 8, Opac = 1
Add some text if you'd like.
I add Friends are stars text using 1BarcarbonateDNA font. Size 16, Bold, Sharp, #251f2b, with a drop shadow.
Rename this layer to text.
Change blend mode to burn.
Time to add some accents, embellishments etc...
From the scrap kit, I added stars, resized, on a new layer.
I changed the blend mode to screen.
I added Ribbon2 and Flower, resized to around 80%
I duplicated my Flower to add multiples around the bottom of the tag.
You can leave them as is, or you can adjust the color, as I did, to grayscale
( Hue = 0 Saturation = 0 )
When you are happy with your placements, you can leave them on their own layers or
X out all bottom layers and merge all your embellishment layers visible.
I left mine open, but renamed them so I knew those layers and incase I wanted to move them later.
Add your tube as a new layer.
Duplicate that layer 1 x
#1 tube - change blend mode to screen
#2 tube - apply a dark drop shadow or dark glow.
Merge those 2 tube layers visible.
Rename that layer to tube
Add any CR info.
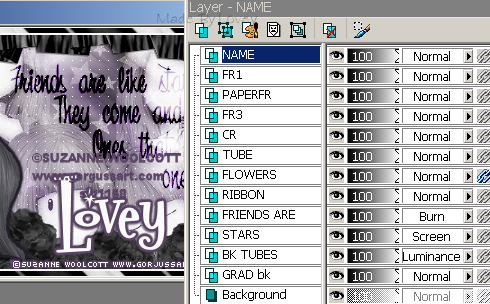
Add name.
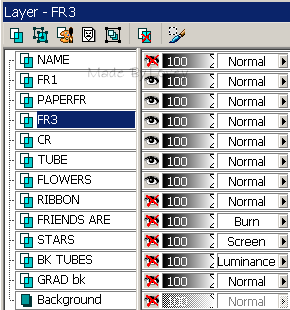
This is what my layers look like at this point.
Now get ready to take it over to animation shop.
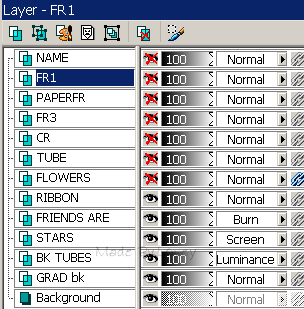
X out all the top layers.
Open layers are background, gradfill, bktubes,embellishments.
This is how your layer palette should look.
Edit - copy merged
Over to Animation shop, Edit, paste as a new animation.
Duplicate your tag till you have 15 frames.
Click your propagate tab on AS toobar.
Open the animation,
Line it up above your tag to easily drag it onto your tag
Click on 1st frame of ani, edit - select all
Click on 1st frame of tag, edit - select all
Drag the ani onto your tag in place of your liking.
Repeat this step a couple of times, dragging the ani onto in different places.
If you're not happy, simply redo until you have it placed to your liking.
Leave this for a bit, we'll come back later,
Back to PSP.
Time to add some action ( animation ) to our tagframes.
X out all layers except those shown below,
With FR3 highlighted, duplicate that layer 2 x's ( total of 3 FR3 layers)
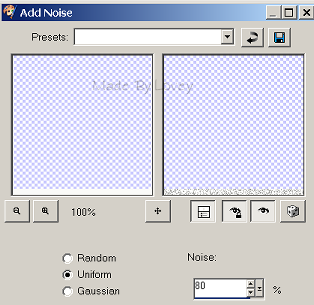
Apply noise to each of those layers, either change the # or just click the uniform button 2 and 3 times.
X out top 2 layers of those frames. Keeping FR3 open.
Highlight PaperFrame layer.
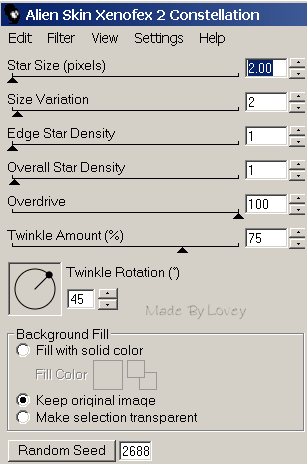
Duplicate that layer 3 x's. Apply Xenofex2 - Constellation to each of those layers, click the random seed each time.
My settings are below:
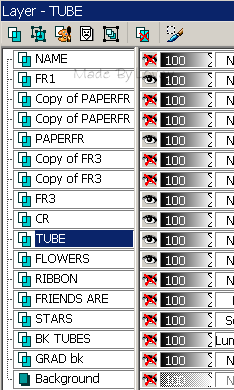
X out top 2 layers of those frames. Keeping PaperF open.
Your layer palette now looks like this:
Highlight your tube layer.
Now we're going to add some twinks to the tube for animation.
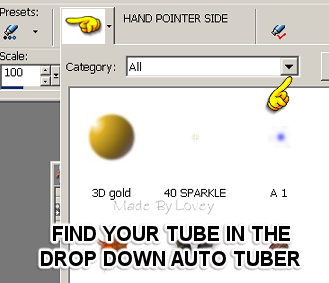
I use my auto tuber, because it's easy and doesn't require added layers or selections.
To do this, just export your twink into a picture tube.
( File - export - picture tube- window pops up, name your tube, click ok)
Then it will appear in your auto tuber to apply direct without layer.
Add some twinks to the stars on the tube, not all stars, just a couple.
Edit copy merged,
Over to AS, edit, paste as a NEW animation.
Back to PSP,
Edit, undo the twinks you added,
X out your FR layers that were open.
UnX the next FR layers.
Highlight tube layer.
Add a couple more twinks on the stars, making sure they aren't on the same ones as previous.
Edit- copy merged.
Into AS edit, paste AFTER current frame.
Back to PSP,
Edit, undo all the twinks you added.
X out the second frame layers.
UnX your last frame layers.
Highlight your tube layer.
Add a couple more twinks to different stars.
Edit - copy merged
Into AS edit - paste after current frame.
You have 3 animation frames of your tagframe
Click on the 1st frame
Edit, select all - edit copy - click on the last frame
Edit - paste - after current frame.
Keep pasting until you have 15 frames.
We're almost finished!
It's time to put it all together,
Click on the 1st frame of your tagframes animation.
Edit - Select all - Edit - copy
Click on the 1st frame of your tag animation
Edit - select all - edit - paste into selected frame.
Let it move, don't move your cursor, it will line up perfectly.
Once the frames have moved onto your tag, then click your mouse.
It will paste itself.
Edit- select all - animation- frame properties and set the frame speed @16.Click ok.
View animation, if you like, save it as a .gif
If you aren't happy with it, simply edit, undo pasting and redo till you're satisfied.
Now go back to PSP and make an avi to match :o)
Hope you've enjoyed this tut.
Don't hesitate to write if you have any problems or questions.
I'd love to see your finished results too!!
Happy PSPing!!
Tut written by Lovey'11 July 9th 2011
Any resemblance to any other tut is purely coincidence.
Subscribe to:
Posts (Atom)
♥ Click for my profile ♥

loves2pspxox@aol.com


♥Grab My Blinkie♥

♥Places I Love♥