♥ Labels ♥
- Tutorials (36)
- Animations (29)
- St Patricks Day (6)
- Templates (5)
- Valentines (4)
- Easter (3)
♥Chit Chat♥
♥Favorite Scraps♥
♥PSP Stuff♥
Saturday, April 26, 2008
GETTING TO KNOW PAINT SHOP PRO
GETTING TO KNOW YOUR PSP
Everyday I am learning new things in Paint Shop Pro. It took me a very long time to find my way around. I hope this tut will give you an idea where things can be found and how some of the tools are used.
This tut is screen shots of your Paint Shop Pro 9.
First, let's take a look at your toolbar.
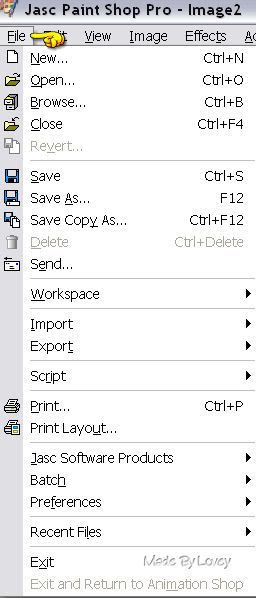
1).FILE:
New = new image-canvas
Open= opening is a quiet view of files in your folders.It has a preview window that shows the image and dimensions.
Browse= your filing cabinet will open your folders and show the contents.
Save- save as- Save copy as= your saving of files.
Import= example, importing brushes from another source or folder from or into your psp program
Export= exporting from workspace, or other source or folder into your psp program
Script= recording your own scripts or applying a script
Preferences is the settings for your program.
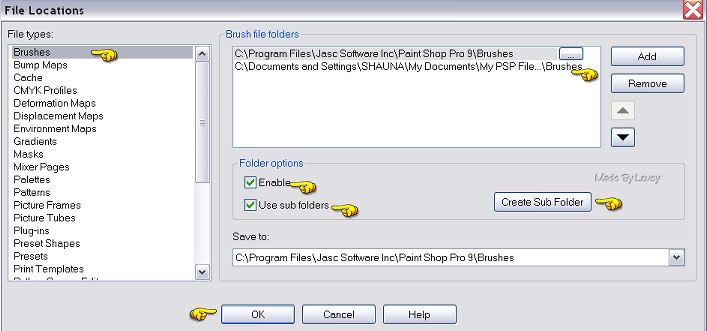
Two of the most important preferences, are FILE LOCATIONS and FILE FORMAT ASSOCIATIONS.
Setting up your file locations allows your psp program to look outside the program for added folders with psp supplies. example, plugins, brushes,etc...without having to store them in the program files itself.Over loading the program can lead to psp crashes, and loss of the program and it's contents.
This is why it is very important for you to set up a main PSP folder in your documents and sub folders inside for those psp supplies.
Example of the path-- Lovey's Documents-- My PSP Folder-- brushes--plugins--etc..the same folders as found in your psp program.
as shown on the right hand side of your file locations window.
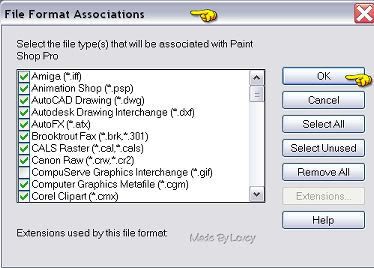
Setting up your FILE FORMAT ASSOCIATIONS.
This set up tells psp to recognize other files.Extensions. Check off all but.... .gif and your wordperfect. Click OK.
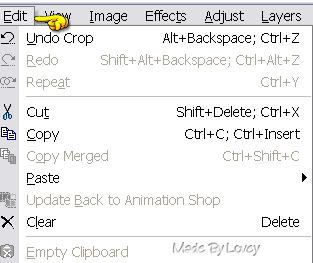
2).EDIT:
In this drop down you will find your UNDO- CUT-COPY-PASTE- etc...some of these functions can be found on your right mouse click if you are using windows.
Empy clipboard is very important. Keep your clipboard empty to avoid losing your work in the event it shuts down without notice.
When you are doing a lot of copying and pasting back and forth to animation shop, keep a close eye on your clipboard and don't let it get full. Just click on empty clipboard and it will clean the board.
VIEW drop down is the set up to your workspace and what you want on your toolbars.Set up is how you want your workspace to look.
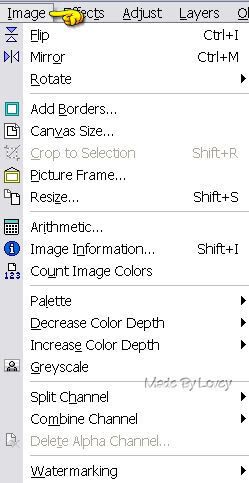
3).IMAGE:
In this drop down you'll see functions that will change your images. Fill, mirror etc... Here is where you will find your boarder and frames, and of course your resize for images.
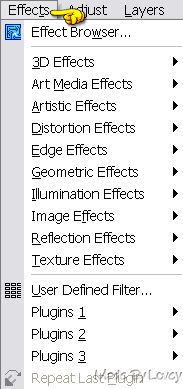
4).EFFECTS:
My favorite place :o) In this drop down you will find the many different effects psp can do to your images. The added folders are your plugins.These are the folders you have outside of PSP but have redirected the program to locate them as explained above in preferences: file locations.
Plugins are filters or programs that add tons of special effects to images. There are many offered free on the web and some are for purchase.
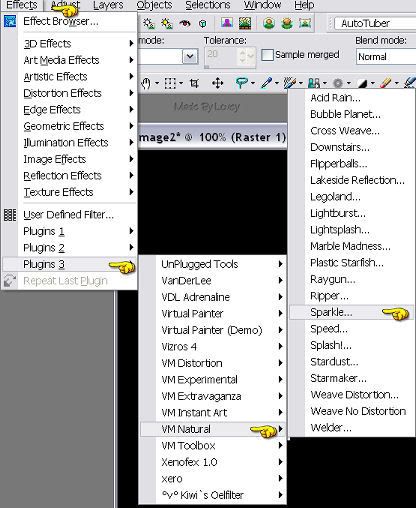
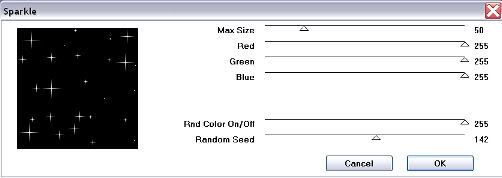
An example of a plugin is VM NATURAL- This filter is what gives sparkles to tags and many other effects. See example below.
Plugins are filters or programs that add tons of special effects to images. There are many offered free on the web and some are for purchase.
An example of a plugin is VM NATURAL- This filter is what gives sparkles to tags and many other effects. See example below.
This effect, on 3 layers becomes a sparkle animation.
The best way to find out what effects can do to the image is to play around and experiment.
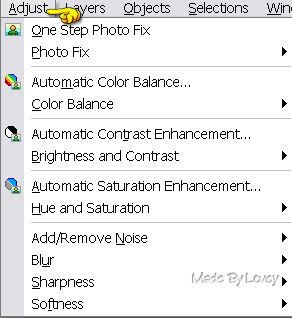
5). ADJUST:
In this drop down you will find all sorts of effects and changes you can make to your image.
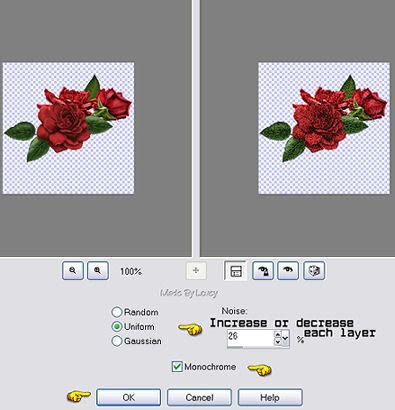
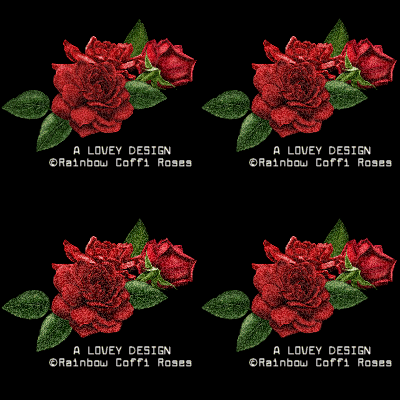
Add/remove noise is a popular effect.
When it is applied on layers and each layer taken to Animation shop it then becomes animated glitter.See example below.
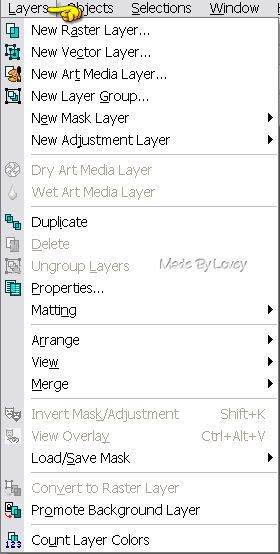
6). LAYERS:
In this drop down you will find your commands to add new layers, add masks,etc... this drop down can also be found on a right click of your mouse while on the layer palette.
This is a section you will use constantly. Converting layers, duplication of layers and merging layers.
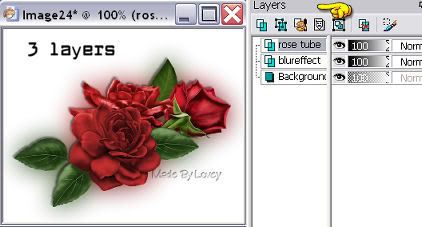
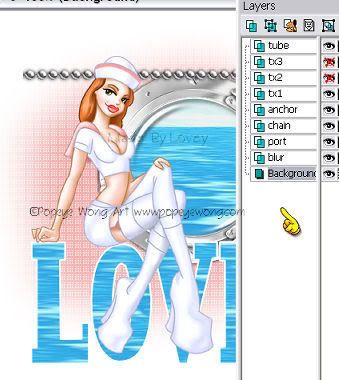
Your new image is the background and everything you add onto that background becomes a layer.Stack the layers to create the final graphic.When all layers are visible you can see the graphic come together. When you're happy with what you have created, merge layers and save.
Example below of a layers on your palette.
7).OBJECTS:
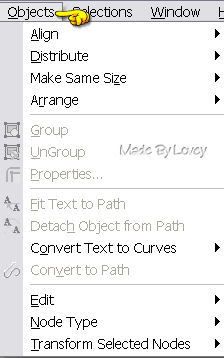
In this drop down you will find your aligments and coverting text. When converting text to curves as character shapes your letters become individual on their own layers. Click on the X beside the text layer on your layer palette and you will see each letter.
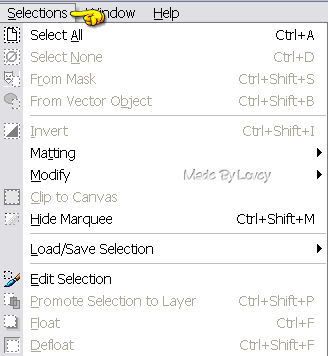
8).SELECTIONS:
In this drop down layer you will find commands that you will use frequently in selecting part of images or all of images and text to apply effects or change.
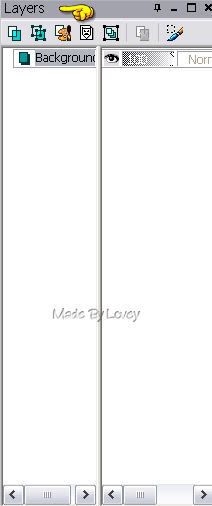
9). LAYER PALETTE.
This is where your layers will build. You see the lil eye beside each layer. Click on that eye and it will X OUT that layer, click on it again and it will take the X off to show the layer again. This is useful in many areas. You will notice in my tuts I will say UnX or X out a certain layer, because when working with duplicates it is easy to get lost on what layer you are applying any effect or merging.
Beside the eye you will also see the word NORMAL. Right click on your mouse will show you effects you can use on the image on that layer only.
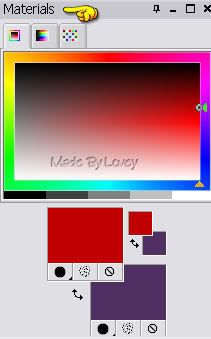
10).COLOR PALETTE:
This is where you will find all your colors, patterns and gradients.
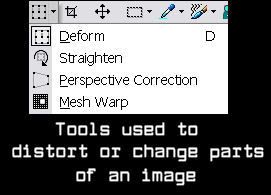
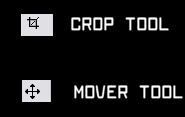
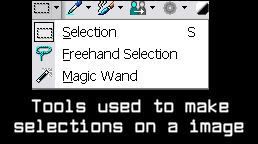
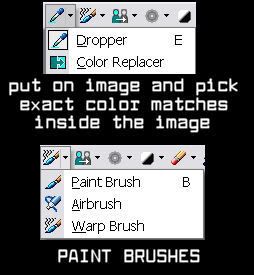
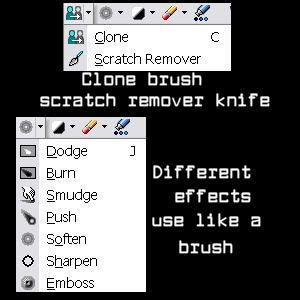
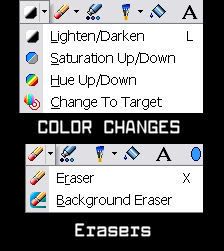
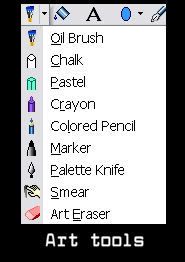
11). TOOL BAR:
Play around and see what they can do!
Hope you have found this peek inside Paint Shop Pro helpful.
Wednesday, April 23, 2008
Water and Warp
Anchors Away
For this tut you will need:
PSP 9 with warp brush
Animation shop
Tubes of choice I used the fun and wonderful work of Popeye Wong.
You can find his art~~
Fat font- I used 2 Peas Essential.
Let's begin.
Open a new white image 600x600 so we have lots of room to work.
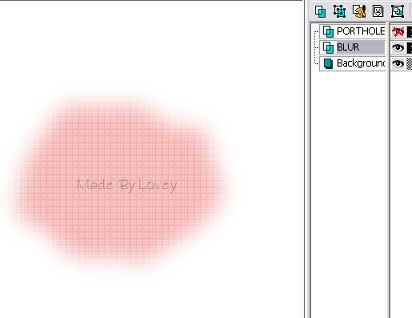
Add a new layer, rename it "blur".
Copy and paste your port hole tube as a new layer. X out that layer.
Activate the blur layer.
Foreground color set at a color from tube.
Spray paint brush with these settings: Tip round-Size @ 60, Hardness @ 10, Step@ 25, Density @ 100,
Thickness @ 100, Rotation 0, Opacity @100.
Draw a large circle in the middle of your canvas, unx porthole layer to check and make sure your circle goes around the outside of the porthole.
With your blur layer active- effects-plugins- penta- dot n cross @ these settings:
Amount=72 Distance=10 Cross width =2.
UNX porthole. Add a drop shadow of choice. I used v&H=0 opac.=35 blur@ 7.
Copy and paste your chain tube, then your anchor tube and then your sailor on as new layers.
Place chain above the porthole, and anchor to the right fitting into the chain.
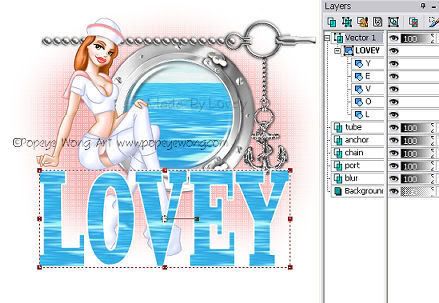
Your layers should be: white back,blur,port,chain,anchor,tube.
Copy and paste your chain tube, then your anchor tube and then your sailor on as new layers.
Place chain above the porthole, and anchor to the right fitting into the chain.
Your layers should be: white back,blur,port,chain,anchor,tube.
With the tube layer active
add text on a vector in a fat font--I used 2 Peas Essential. Size 48, stroke 2.foreground white and background fill @ water fill pattern. Stretch the text to fit under the sailor, as she is sitting on the first letter.
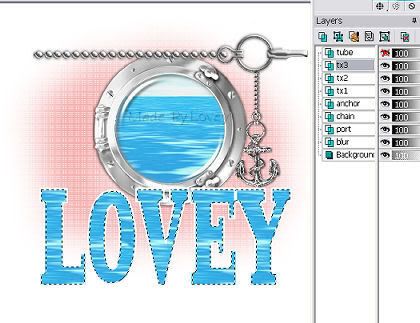
If you want each letter on its own, keep as a vector--click objects-convert text to curves-as character shapes. On your layer palette click the + beside the vector. I will open the layers to each letter on its own. Active the letter you want and the nodes will be there for you to manipulate.
When you are happy with your text. Convert layer to a raster. Rename the layer text. Move that layer below the tube layer.
Activate text layer, X out tube layer. Selections-select all-float-defloat- modify-contract 2. Duplicate this layer 2 x's. Ants still marching, rename layers tx1-2-3.
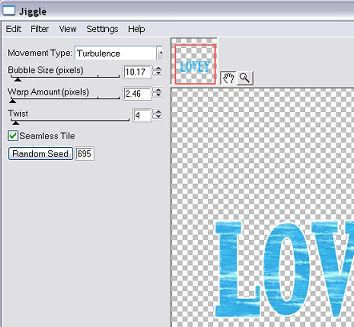
Effects- Eye candy 4000- Jiggle: Settings below
Click ok.
Xout tx 1 --UnX tx 2- Jiggle click random seed once.
Xout tx 2--Unx tx 3-Jiggle click random seed once. Selections- Select none.
Apply a drop shadow to all the tx layers. X out tx2- tx 3.
Un X tube layer.
Xout tx 1 --UnX tx 2- Jiggle click random seed once.
Xout tx 2--Unx tx 3-Jiggle click random seed once. Selections- Select none.
Apply a drop shadow to all the tx layers. X out tx2- tx 3.
Un X tube layer.
This is how your layers should look.
Activate white background layer. Merge visible. Copy and paste into animation shop as a new animation.
Back to PSP- undo merge. X out tx 1- UnX text 2-
Activate tube layer. Warp brush at these settings:Mode push- Size@35 - Hardness @ 10
Remember just warp a wee bit. Push DOWN on heel of right shoe and UP on toe of that same shoe.
Merge visible-- Copy and paste in AS after current animation.
Back to PSP. undo merge, undo warp, X out tx 2 and UNX tx 3.
Activate tube layer. Warp brush. Push DOWN just a wee bit on her hand.
Change warp brush size to 10 and push the brush @ left side corner of lips, just a little bit towards the right. Pull down on the bottom lip and push towards the left on the right corner of lip.
Merge visible. Copy and paste into Animation shop after current frame.
You have 3 frames in animation shop. Edit--Select all- Animation frame properties @ speed 22.
View your animation, if you like it, save as gif.
If you have changes you want to make. Go back to PSP, undo merge and undo warp, begin again on warping till you have the movement you like.
Hope you have enjoyed this tutorial.
Saturday, April 19, 2008
ANIMATION SHOP SETTINGS
I'm sure there are a few that are new to Animation Shop so I thought it would be helpful to show the settings I use in the program.
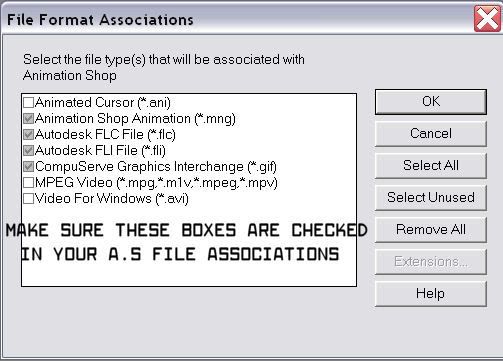
First step is checking your "FILE ASSOCIATIONS".
Click file... preferences.... file associations.
Make sure you have all your file associations checked off.
This is what your association window should look like:
Make sure you have all your file associations checked off.
This is what your association window should look like:
Check your Customize Optimization Settings (on a transparent back)
Open an transparent back animation.
click ok, customize.... and look under the partial transparency settings.
Open an transparent back animation.
click ok, customize.... and look under the partial transparency settings.

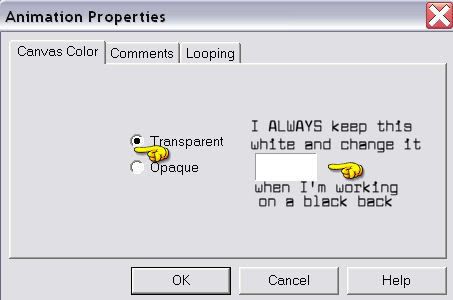
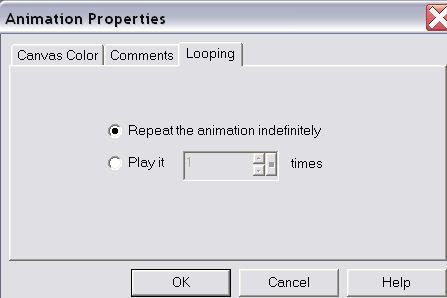
Here are the screen shots to my properties in AS. Open an animation, the click on animation properties...
This is how your windows should be marked.
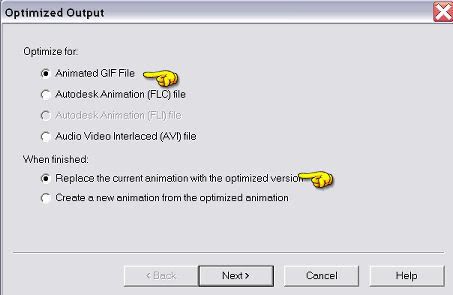
OPEN AN ANIMATION... click on file.....optimization wizard.
first window:
first window:
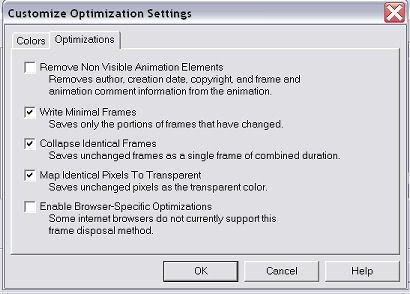
next window click on customize
then these settings
then these settings
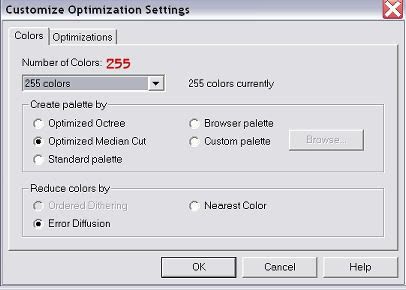
Change back and forth on the Optimized Octree and Median Cut to see which one works for the colors and tubes you're using.
Sometimes, the Octree setting will decrease the grainy on animations.
Hope this has been useful to you.
Tuesday, April 01, 2008
Using Filters to Create Animation
Supplies Needed:
PSP and Animation Shop
Eye Candy 4000
DBS Flux Filter
Tube of choice
I am using the beautiful artwork of Nene Thomas.
Let's get started!
Open a new white image 500 x 500.
Open your tube, duplicate-(shift + D) Close off original tube.
Activate tube, edit copy, edit paste it onto the new white image as a new layer.
Duplicate that layer. Rename the original layer-BLUR and the duplicated layer TUBE.
Activate the BLUR layer.
Adjust, blur, gaussian blur @ 21
Effects, texture, blinds @ these settings:
Width 8 Opac 20 Color White check mark Light from top.
Activate TUBE layer and with your freehand tool- settings freehand, add/shift 0 feather anti alias checked off, go around the black part of the wings.
Keep the ants marching and PROMOTE THE SECTION TO A LAYER.
Duplicate the promoted section layer 2 times for a total of 3 promoted section layers.
Select None
Rename those layers, Wing 1 Wing 2 Wing 3
X OUT Wing 3 and 2 layers. Activate Wing 1 layer.
Effects- Eye Candy 4000- HSB Noise.
Settings - Necrotic tissue random seed @ 431 Click ok.
XOUT Wing 1 layer, UnX Wing 2 layer.
Effects, Eye Candy, HSB Noise, click the random seed once.
XOUT Wing 2 layer, UnX Wing 3 layer.
Effects, Eye Candy, HSB Noise, click random seed once.
XOUT Wing layer 3 and 2. Activate Tube layer.
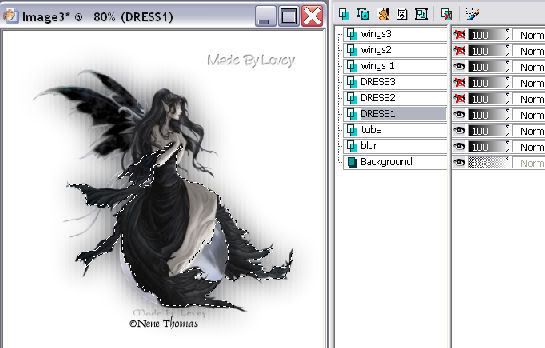
Freehand tool, same settings, go around the dress area on the tube.
Keep the ants marching. Promote the section to a layer.
Duplicate that promoted section 2 times, for a total of 3 promoted section layers. Select none.
Rename those layers, dress 1 dress 2 dress 3.
XOUT dress 3 and 2 layers. Activate dress 1 layer.
Effects- Eye Candy 4000- Jiggle.
Settings- Bubbles-- Bubble size 10.17-- Warp amount 2.46
Twist @ 4 -- Seamless tile UNCHECKED-- Random seed @ 238
Click ok.
XOUT dress 1-- UnX dress 2
Effects--Eye Candy 4000- Jiggle, and click the random seen once.
Click ok.
XOUT dress 2-- UnX dress 3
repeat the eye candy jiggle clicking the random seed once. Click ok.
XOUT dress 3 and 2.
Activate Tube layer.
With your freehand tool go around the ball the fairy is sitting on.
Keep the ants marching. Promote the section to a layer.
Duplicate that layer 2 times. Total of 3 promoted section layers.
Rename those layers, ball 1 ball 2 ball 3.
Xout ball 3 and 2 layers. Activate ball 1 layer.
Now you can use the DBS Flux filter or the noise in your psp program.
If you have the dbs flux filter-- go to plugins--dbs --click on noise.
Settings: Bright noise, 24, mix checked , click ok.
** psp noise** Adjust--add noise--
settings: 24--check uniform, check monchrome, click ok.
Xout ball 1--UnX ball 2- repeat the noise, but change the setting to 28 click ok.
Xout ball 2, UnX ball 3, repeat noise, but change the setting to 32.
When you noise has been applied, X out ball 3 and 2 layers.
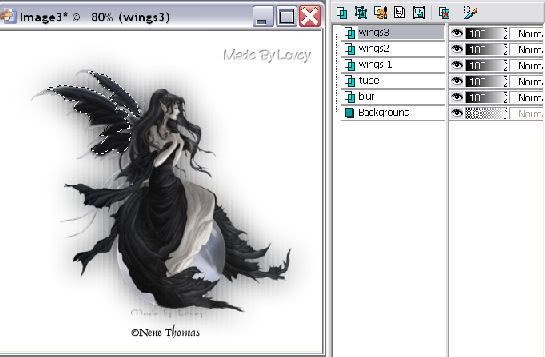
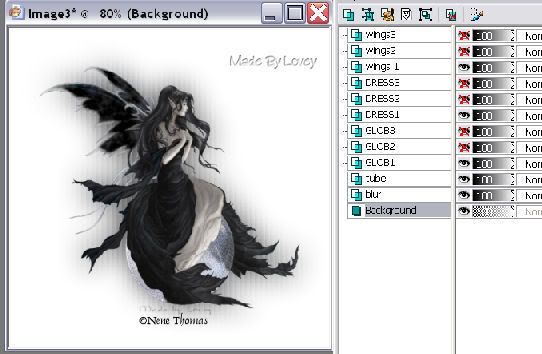
This is how your layers should look.
If you would like to add a paint brush embellishment, add a new raster layer about the blur layer and add your brush work.
Now we are going to begin to animated those layers.
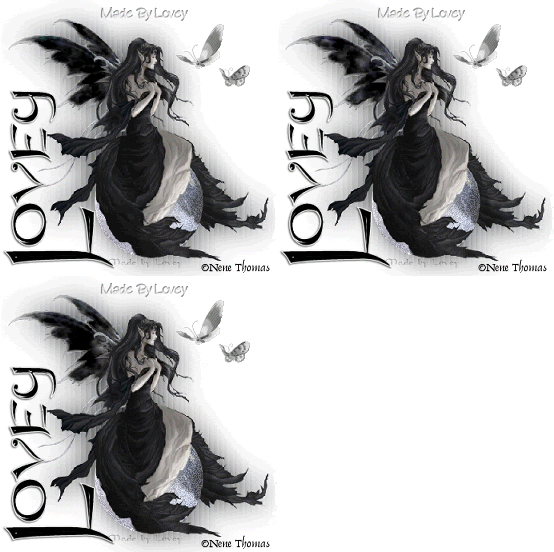
Merge visible, copy, and paste into animation shop as a new animation.
Back to PSP, undo merge, X wing 1, X dress 1, X ball 1.
UnX wing 2, dress 2, ball 2--merge visible, copy and paste into animation shop after current frame.
Back to PSP. Undo merge.
X wing 2, X dress 2, X ball 2--UnX wing 3, dress 3 and ball 3.
Merge visible, copy and paste into animation shop after current frame.
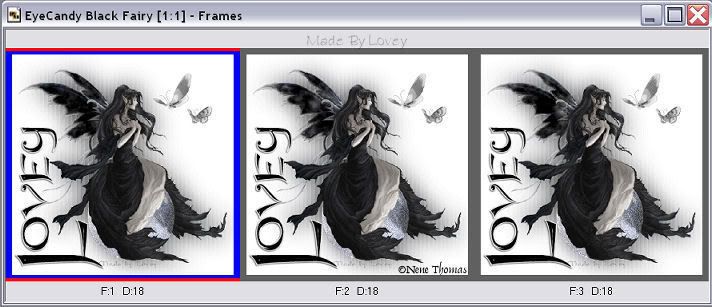
You now have 3 frames in animation shop.
Edit, select all, animation, animation frame properties set at 18.
View your animation, if you're happy with it, save as .gif
Way to go! You're finished.
Hope you have enjoyed this tut.
**Remember you can add any text to a finished animation.**
This tut was written by me April 1 2008.
Any resemblance to other tuts is purely coincidental.
All Pspers have at one time used the same filters.
Subscribe to:
Posts (Atom)
