♥ Labels ♥
- Tutorials (36)
- Animations (29)
- St Patricks Day (6)
- Templates (5)
- Valentines (4)
- Easter (3)
♥Chit Chat♥
♥Favorite Scraps♥
♥PSP Stuff♥
Wednesday, April 23, 2008
Water and Warp
Anchors Away
For this tut you will need:
PSP 9 with warp brush
Animation shop
Tubes of choice I used the fun and wonderful work of Popeye Wong.
You can find his art~~
Fat font- I used 2 Peas Essential.
Let's begin.
Open a new white image 600x600 so we have lots of room to work.
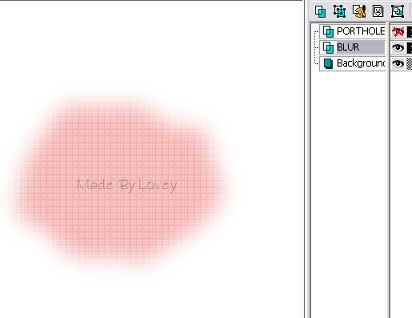
Add a new layer, rename it "blur".
Copy and paste your port hole tube as a new layer. X out that layer.
Activate the blur layer.
Foreground color set at a color from tube.
Spray paint brush with these settings: Tip round-Size @ 60, Hardness @ 10, Step@ 25, Density @ 100,
Thickness @ 100, Rotation 0, Opacity @100.
Draw a large circle in the middle of your canvas, unx porthole layer to check and make sure your circle goes around the outside of the porthole.
With your blur layer active- effects-plugins- penta- dot n cross @ these settings:
Amount=72 Distance=10 Cross width =2.
UNX porthole. Add a drop shadow of choice. I used v&H=0 opac.=35 blur@ 7.
Copy and paste your chain tube, then your anchor tube and then your sailor on as new layers.
Place chain above the porthole, and anchor to the right fitting into the chain.
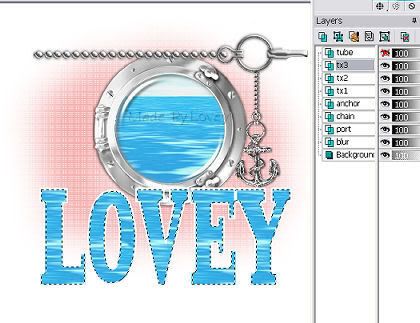
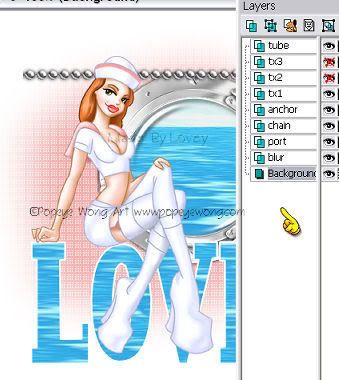
Your layers should be: white back,blur,port,chain,anchor,tube.
Copy and paste your chain tube, then your anchor tube and then your sailor on as new layers.
Place chain above the porthole, and anchor to the right fitting into the chain.
Your layers should be: white back,blur,port,chain,anchor,tube.
With the tube layer active
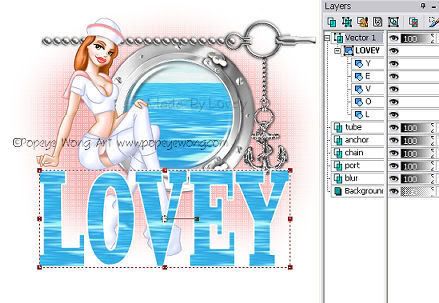
add text on a vector in a fat font--I used 2 Peas Essential. Size 48, stroke 2.foreground white and background fill @ water fill pattern. Stretch the text to fit under the sailor, as she is sitting on the first letter.
If you want each letter on its own, keep as a vector--click objects-convert text to curves-as character shapes. On your layer palette click the + beside the vector. I will open the layers to each letter on its own. Active the letter you want and the nodes will be there for you to manipulate.
When you are happy with your text. Convert layer to a raster. Rename the layer text. Move that layer below the tube layer.
Activate text layer, X out tube layer. Selections-select all-float-defloat- modify-contract 2. Duplicate this layer 2 x's. Ants still marching, rename layers tx1-2-3.
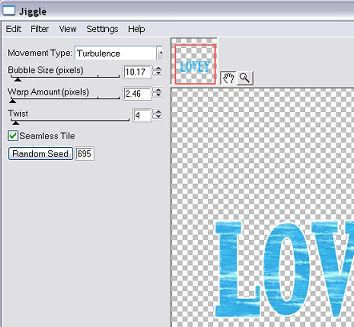
Effects- Eye candy 4000- Jiggle: Settings below
Click ok.
Xout tx 1 --UnX tx 2- Jiggle click random seed once.
Xout tx 2--Unx tx 3-Jiggle click random seed once. Selections- Select none.
Apply a drop shadow to all the tx layers. X out tx2- tx 3.
Un X tube layer.
Xout tx 1 --UnX tx 2- Jiggle click random seed once.
Xout tx 2--Unx tx 3-Jiggle click random seed once. Selections- Select none.
Apply a drop shadow to all the tx layers. X out tx2- tx 3.
Un X tube layer.
This is how your layers should look.
Activate white background layer. Merge visible. Copy and paste into animation shop as a new animation.
Back to PSP- undo merge. X out tx 1- UnX text 2-
Activate tube layer. Warp brush at these settings:Mode push- Size@35 - Hardness @ 10
Remember just warp a wee bit. Push DOWN on heel of right shoe and UP on toe of that same shoe.
Merge visible-- Copy and paste in AS after current animation.
Back to PSP. undo merge, undo warp, X out tx 2 and UNX tx 3.
Activate tube layer. Warp brush. Push DOWN just a wee bit on her hand.
Change warp brush size to 10 and push the brush @ left side corner of lips, just a little bit towards the right. Pull down on the bottom lip and push towards the left on the right corner of lip.
Merge visible. Copy and paste into Animation shop after current frame.
You have 3 frames in animation shop. Edit--Select all- Animation frame properties @ speed 22.
View your animation, if you like it, save as gif.
If you have changes you want to make. Go back to PSP, undo merge and undo warp, begin again on warping till you have the movement you like.
Hope you have enjoyed this tutorial.
Subscribe to:
Post Comments (Atom)




0 comments:
Post a Comment