Tuesday, March 20, 2012
TV JUNKIE

I used the fun art of Leigh Young.
Leigh Young
You must purchase and have a license to use this tube.
Scrap kit I am using is called,
"Movie Night Marathon"
This is now a PTU kit and can be found
Movie Night Marathon Scrap Kit
Mask used is by WesscottLass
WSL_mask147
Grab this mask
Look on the right side bar, WSL_Masks121-180 for the download link
HERE
I made a template for this tag and you can grab it
Download HERE
XenoFex 2- Constellation
Font is Felt Marker
I am work with PSP9
I am assuming you have a working knowledge of the program.
Ok let's get started.
Download your supplies. Put mask in your mask folder.
Open PSP, open template, delete creditlayer.
Active layer is above the white background layer.
Copy and paste paper 7 from the kit as a new layer.
Go to layers, apply mask, from disk,
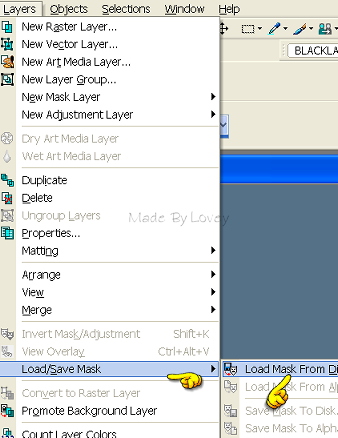
find the wsl_mask147 in the drop down and apply.
On your layer palette, delete mask layer, then merge group.
Layer palette, active bars layer.
Paper 1 from kit, resize, rotate 90 degrees to right.
On your materials palette click on the pattern tab, find the paper,
Unlock the x on your layer palette to open that layer and flood fill the bars with the paper pattern.
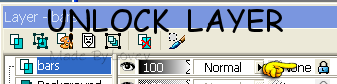
CLICK ON THE LOCK TO CLOSE IT AGAIN.
Apply a gradient glow to the bars
Highlight Rect 1 layer
Effects-Texture effects-Weave
Apply these settings.
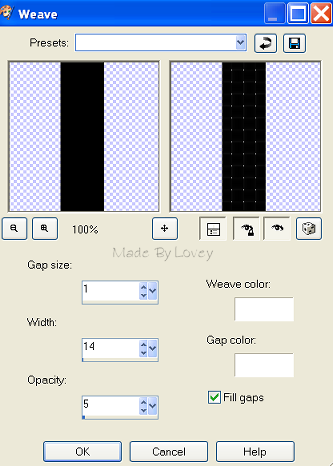
Highlight Rect 2 layer and apply the same weave effect.
Add a gradient glow to those rectangles.
Highlight Rect 2 - merge down.
Rect 3 - Apply the same weave and gradient glow
Highlight Lg circle layer.
Paper 4 from kit. Resize- Rotate 90 degrees to right.
You can flood fill this layer with that paper by unlocking that layer..
or
you can select all copy n paste the paper
as a new layer then invert selections, & delete.
I think either work well, so it's your choice.
Don't forget to lock the layer again, before moving on or applying any effects.
Copy and Paste Star2 from kit as a new layer.
Place it in the center of the lg circle.
or, keep the one I made on the template.
Effects, plugins Xenoflex- Constellation.
Apply a small amount on the star.
Highlight small circle layer. Unlock the layer.
Flood fill with a gradient made of 2 colors from your tube.
Lock the layer.
Copy and paste your tube as a new layer.
Highlight the small circle layer- Selections-Select all
Highlight the tube layer - Selections- Invert- hit delete on your keyboard.
You can apply filters or play with blends as you like for your tube.
Highlight circle frame
Unlock that layer, flood fill with color of choice from your project.
Lock the layer.
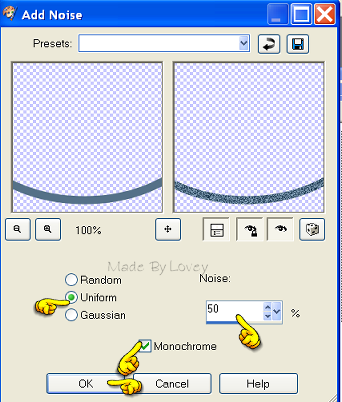
Adjust- Add/remove noise - Add noise
Apply the settings below
Apply a gradient glow on the frame.
Close off all layers, except, sm circle-tube and circle frame.
Layers, merge visible, rename - circletube.
Now it's time to add some elements from the kit.
I added
Bow- Kernel - Popbucket - Puffysticker2- Ribbon 1 and Star2
I put 2 ribbons untop of the large circle layer
and added some single popcorns around.
Once you have everything placed as you like,
add drop shadows, merge visible.
RESIZE HERE if you need.
(Don't resize after you've placed your
CR because it makes the CR info blurry)
Add your CR info, Add your text.
Delete the white background layer.
Layers, Merge Visible,
Save as - Save as a png.
Hope you've enjoyed this tutorial.
I'd love to see your results!
*** COMING SOON ***
The forum set to match!

Happy PSPing.
Tut written by © Lovey'12 March 20,2012
Any resemblance to any other tut is purely coincidence.

Subscribe to:
Post Comments (Atom)
♥ Click for my profile ♥
loves2pspxox@aol.com


♥Grab My Blinkie♥

♥Places I Love♥


0 comments:
Post a Comment