Saturday, October 18, 2008
INVERT TO DELETE
Recently I tried to explain these steps but found it's so difficult to explain in words so I thought I'd show with ss's.
Usually a mask and tubes are on separate layers, but in this case, I didn't add a layer before adding my cloud tubes and the clouds are directly on the mask layer.
It worked out fine, because I didn't want the mask outside the frame anyway.lol.
But here is how I removed all the outside stuff and left only the tubes inside the frame.
My steps to this point were, new transparent image.
I flood filled with white.
New layer flood filled with yellow, and applied a mask.
Applied auto cloud tubes and copy & pasted my mouse tubes on as a new layer.
This is what it looks like:
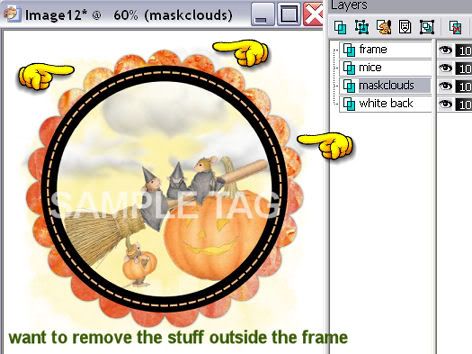
I want to remove everything outside the frame.
So here are the steps to achieve that result.
Highlight the frame layer.
Using your magic wand, click inside the frame.
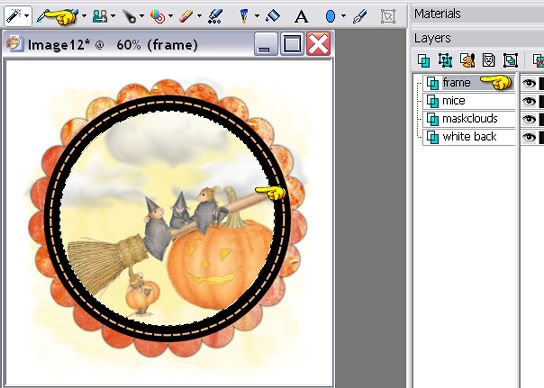
Ants will be marching inside the frame area.
Go to selections
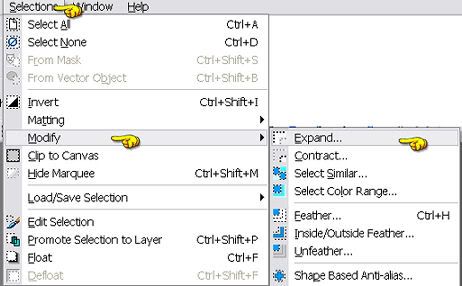
--MODIFY--EXPAND by 3
SELECTIONS---INVERT---
Highlight the maskcloud layer
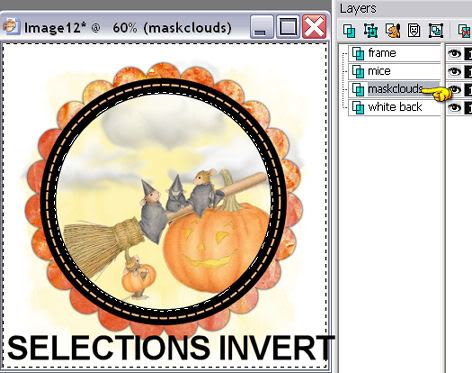
HIT DELETE key on your keyboard.
Everything outside the frame will be removed.
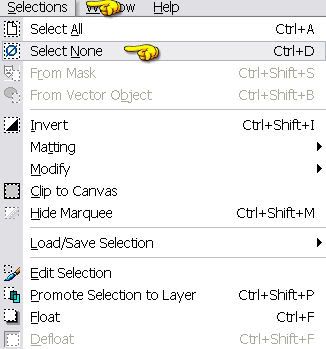
Select none.
Here's the finished image.
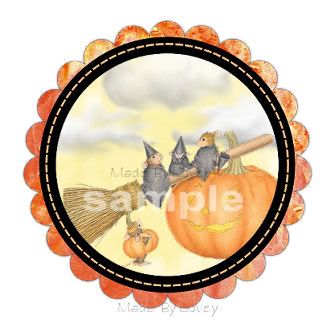
:o)Hope this helps if you ever find yourself needing to delete stuff.
Usually a mask and tubes are on separate layers, but in this case, I didn't add a layer before adding my cloud tubes and the clouds are directly on the mask layer.
It worked out fine, because I didn't want the mask outside the frame anyway.lol.
But here is how I removed all the outside stuff and left only the tubes inside the frame.
My steps to this point were, new transparent image.
I flood filled with white.
New layer flood filled with yellow, and applied a mask.
Applied auto cloud tubes and copy & pasted my mouse tubes on as a new layer.
This is what it looks like:

I want to remove everything outside the frame.
So here are the steps to achieve that result.
Highlight the frame layer.
Using your magic wand, click inside the frame.

Ants will be marching inside the frame area.
Go to selections

--MODIFY--EXPAND by 3
SELECTIONS---INVERT---
Highlight the maskcloud layer

HIT DELETE key on your keyboard.
Everything outside the frame will be removed.

Select none.
Here's the finished image.

:o)Hope this helps if you ever find yourself needing to delete stuff.
 Labels:

CUTTING TUBES FROM A SHEET
When I first started using tubes in PSP I noticed they came in different formats. Some had a sheet with a bunch of tubes all on different layers and some were on one layer.
It took me awhile to find the proper tool and steps to use to get one tube off the sheet.
So I thought maybe there were others that were having the same problems and this tut is for them :o)
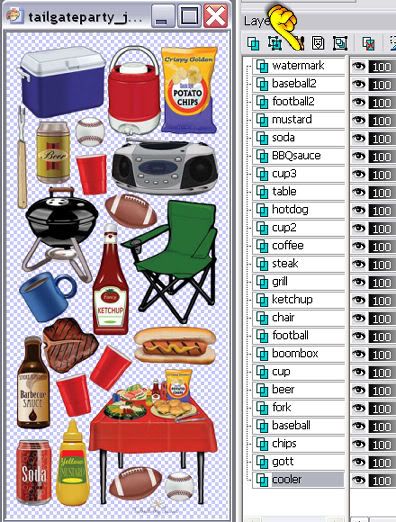
Here is a sheet of tubes that has been tubed all on different layers.
You'll notice on the layer palette they are all named.
On these sheets, it's easy to get just the one tube you want off, just hightlight that tube layer and copy it onto your project or as a new image.
But...... in some cases, the sheet of tubes is all on one layer.
Like the image below:
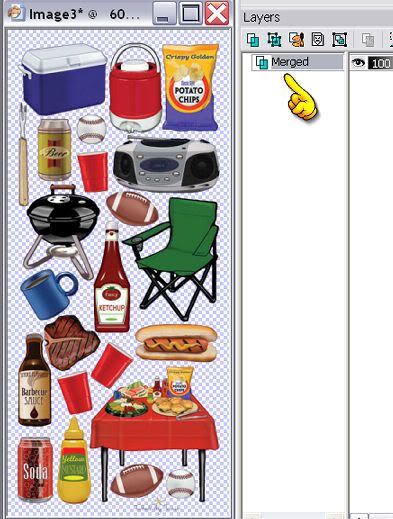
When you have a sheet like this, it's a bit more work to get that one tube off, but once you learn how, it's easy.
You'll need to know your tools. The tool used for this is called the "freehand or lasso".
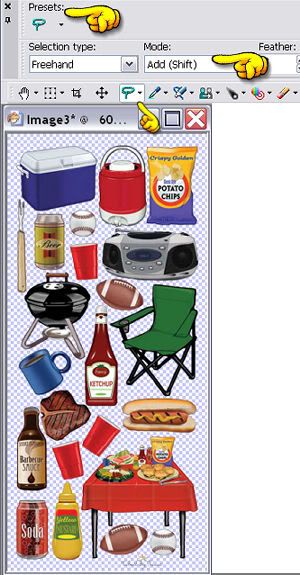
Use that tool to outline the tube you want. Hold down your mouse and go around the tube connecting at your beginning point.
Ants will be marching around when you've completed the outline.
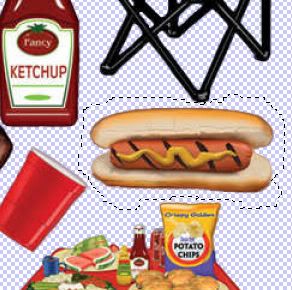
Now you want to keep your tube sheet original, so you want to copy that tube and paste it as a new image.
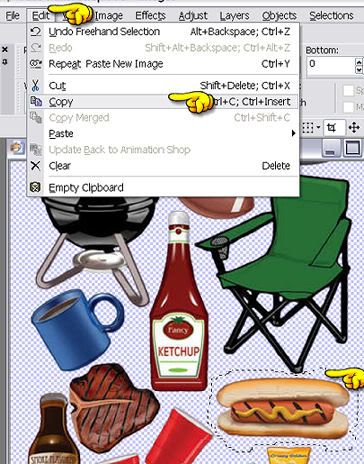
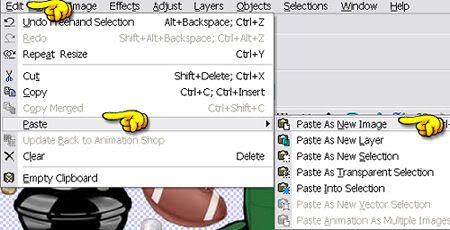
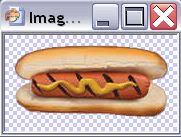
And now you have that one tube. You can save it as a psp image so you can use it later without having to redo the freehand again.
I've always thought of the freehand tool as a pair of scissors lol
Hope this tut helps you get those tubes off one layer tube sheets :o)
It took me awhile to find the proper tool and steps to use to get one tube off the sheet.
So I thought maybe there were others that were having the same problems and this tut is for them :o)
Here is a sheet of tubes that has been tubed all on different layers.
You'll notice on the layer palette they are all named.
On these sheets, it's easy to get just the one tube you want off, just hightlight that tube layer and copy it onto your project or as a new image.

But...... in some cases, the sheet of tubes is all on one layer.
Like the image below:

When you have a sheet like this, it's a bit more work to get that one tube off, but once you learn how, it's easy.
You'll need to know your tools. The tool used for this is called the "freehand or lasso".

Use that tool to outline the tube you want. Hold down your mouse and go around the tube connecting at your beginning point.
Ants will be marching around when you've completed the outline.

Now you want to keep your tube sheet original, so you want to copy that tube and paste it as a new image.


And now you have that one tube. You can save it as a psp image so you can use it later without having to redo the freehand again.

I've always thought of the freehand tool as a pair of scissors lol
Hope this tut helps you get those tubes off one layer tube sheets :o)
Thursday, October 16, 2008
HOW TO INSTALL PLUGINS for PSP
Plugins are a great add to your art programs.
They bring so many different effects to images and can bring the image to life.
A great place to find some fantastic free plugins is:
First begin with making a new folder outside of your program to hold your filters.
IE: Go to your documents, make new folder, name it PLUGINS.
This is where you will install all your plugins that you add to your program.
Putting them outside the program helps PSP to load and work better.
It is also a step in preventing a PSP crash or shut down.
Open your PSP program.
Click on FILE.
Click on PREFERENCES.
Click on FILE LOCATIONS.
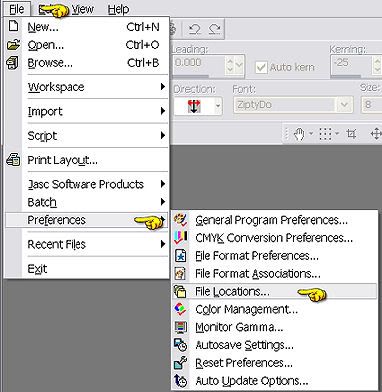
You file locations folder will open.
You will see a list on the left side that has all your PSP program folders. Highlight the "PLUGIN" folder.
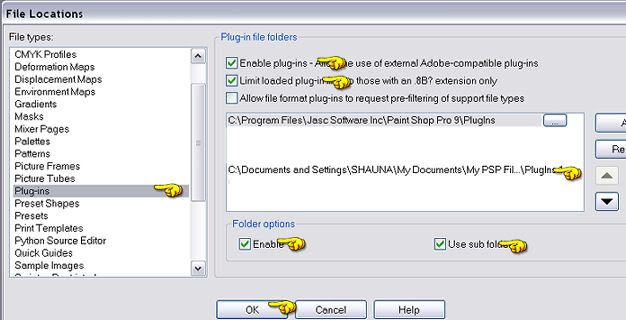
Over on the main page, click ADD.
Use the folder arrow to browse till you find the new folder you made in documents named PLUGINS.
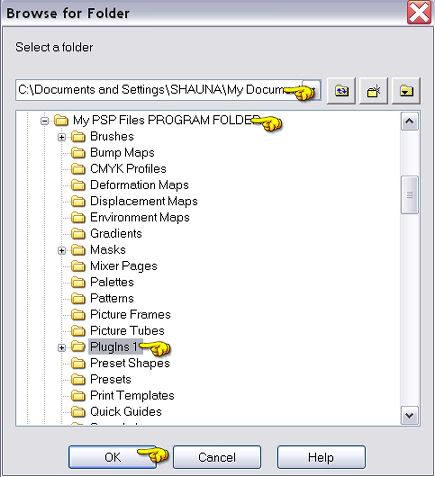
Click ok,
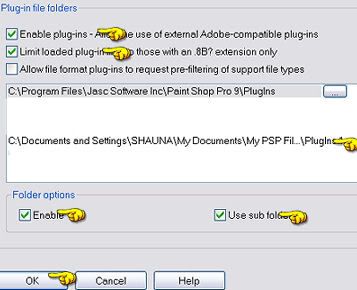
Make sure you have all the same check marks and shown above.
Close out your PSP program.
Now find a plugin you want to install.
Download the plugin to the new plugin folder you made in documents. Extract the file in that folder.
When your finished. Shut down your computer and reboot.
When you're up an running again, open your PSP program.
Open an image,anything will do.
Click on EFFECTS and you shoud now see your new plugin showing in those effects.
Look under "PLUGINS" to make sure it's there.
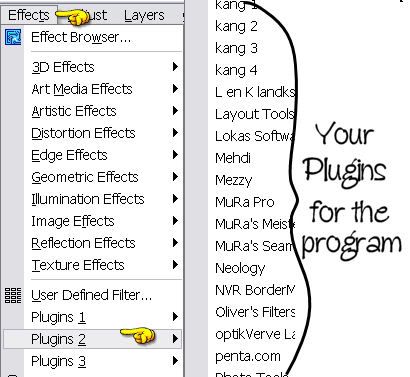
Check out all the cool effects plugins will do to the image you opened.
Have fun, and most of all EXPERIMENT!
Hope you've found this tut helpful.
They bring so many different effects to images and can bring the image to life.
A great place to find some fantastic free plugins is:
First begin with making a new folder outside of your program to hold your filters.
IE: Go to your documents, make new folder, name it PLUGINS.
This is where you will install all your plugins that you add to your program.
Putting them outside the program helps PSP to load and work better.
It is also a step in preventing a PSP crash or shut down.
Open your PSP program.
Click on FILE.
Click on PREFERENCES.
Click on FILE LOCATIONS.

You file locations folder will open.
You will see a list on the left side that has all your PSP program folders. Highlight the "PLUGIN" folder.

Over on the main page, click ADD.
Use the folder arrow to browse till you find the new folder you made in documents named PLUGINS.

Click ok,

Make sure you have all the same check marks and shown above.
Close out your PSP program.
Now find a plugin you want to install.
Download the plugin to the new plugin folder you made in documents. Extract the file in that folder.
When your finished. Shut down your computer and reboot.
When you're up an running again, open your PSP program.
Open an image,anything will do.
Click on EFFECTS and you shoud now see your new plugin showing in those effects.
Look under "PLUGINS" to make sure it's there.

Check out all the cool effects plugins will do to the image you opened.
Have fun, and most of all EXPERIMENT!
Hope you've found this tut helpful.
Friday, September 19, 2008
MAKING YOUR OWN GLITTER
There are many sites on the web that offer glitter swatches for you to use, but sometimes, you'll not find the perfect color to match your project so it's necessary to make your own.
Here's an easy tut on making simple glitter, and glitter with sparkles.
Open your PSP and Animation Shop.
Open a new TRANSPARENT canvas, 100 x 100.
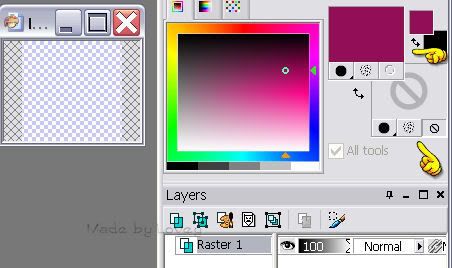
Find the color you want as your main glitter color and flood fill your new canvas with that color.
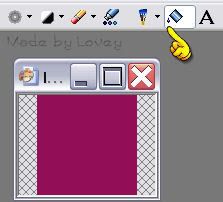
Duplicate 2 times, giving you a total of 3 frames.
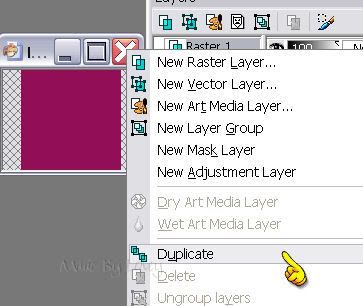
Rename those layers, g1- g2- g3. X out g2 and g3 layers.
Working on g1 layer, click on ADJUST, ADD/REMOVE NOISE ( or use your DBS filter).
Set your noise at around 20, higher if you want more noise.
Click ok.
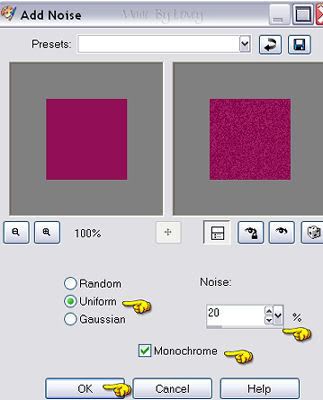
X out g1 layer and UnX g2 layer. Repeat the add noise, but click the UNIFORM button twice.
Click ok.
X out g2 layer and UnX g3 layer. Repeat add noise, click the uniform button 3 times.
This is your simple glitter swatch.
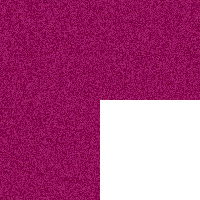
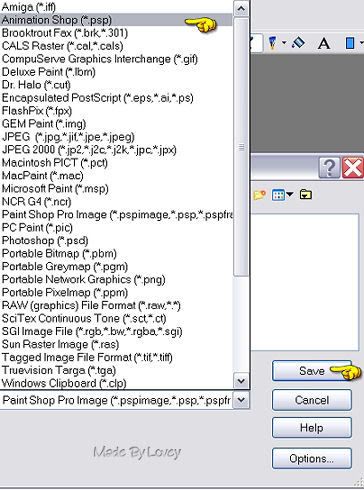
Save as animation so u can open it in your animation shop and export to psp when you want to use it for a fill.
Adding sparkles to glitter, gives a different effect. Sublte and nice.
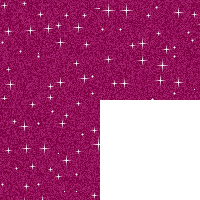
Before saving, go back to g1 layer, and apply your VM Natural sparkles to that layer.
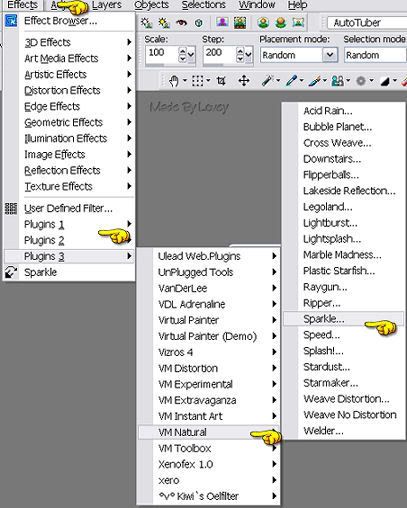
Apply sparkles to each layer as you did the noise.
Change the random seed on each layer.
On mine, I used size 47.
G1 layer random seed = 147
G2 layer random seed = 169
G3 layer random seed =225.
Save as an animation psp.
In Animation shop, find where you saved your glitter, open and see if you like the effect.
If your happy with it, save as a .gif and keep in your glitter files for easy access when you want to use it as a fill in PSP.

Have fun making glitter :o)
Here's an easy tut on making simple glitter, and glitter with sparkles.
Open your PSP and Animation Shop.
Open a new TRANSPARENT canvas, 100 x 100.

Find the color you want as your main glitter color and flood fill your new canvas with that color.

Duplicate 2 times, giving you a total of 3 frames.

Rename those layers, g1- g2- g3. X out g2 and g3 layers.
Working on g1 layer, click on ADJUST, ADD/REMOVE NOISE ( or use your DBS filter).
Set your noise at around 20, higher if you want more noise.
Click ok.

X out g1 layer and UnX g2 layer. Repeat the add noise, but click the UNIFORM button twice.
Click ok.
X out g2 layer and UnX g3 layer. Repeat add noise, click the uniform button 3 times.
This is your simple glitter swatch.

Save as animation so u can open it in your animation shop and export to psp when you want to use it for a fill.

Adding sparkles to glitter, gives a different effect. Sublte and nice.

Before saving, go back to g1 layer, and apply your VM Natural sparkles to that layer.

Apply sparkles to each layer as you did the noise.
Change the random seed on each layer.
On mine, I used size 47.
G1 layer random seed = 147
G2 layer random seed = 169
G3 layer random seed =225.
Save as an animation psp.
In Animation shop, find where you saved your glitter, open and see if you like the effect.
If your happy with it, save as a .gif and keep in your glitter files for easy access when you want to use it as a fill in PSP.

Have fun making glitter :o)
Subscribe to:
Posts (Atom)
♥ Click for my profile ♥

loves2pspxox@aol.com


♥Grab My Blinkie♥

♥Places I Love♥