♥ Labels ♥
- Tutorials (36)
- Animations (29)
- St Patricks Day (6)
- Templates (5)
- Valentines (4)
- Easter (3)
♥Chit Chat♥
♥Favorite Scraps♥
♥PSP Stuff♥
♥Blog Archive♥
Sunday, August 24, 2008
ADDING GLITTER TO TEXT
This tut will show you how to use noise in your PSP to create an animated text in animation shop.
Open PSP and Animation Shop.
Begin with an ready made image or make one which ever you prefer.
I made my image, then merged flat.
It shows on the layer palette as "background".
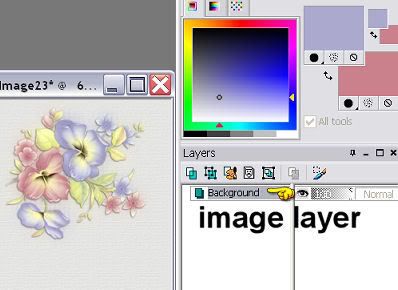
Pick your colors and font for the text.
Apply the text as a vector layer.
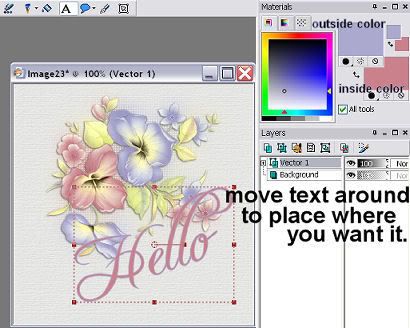
I like vector layers, because I can move them around, stretch them etc... and place them were I want before converting to a raster.
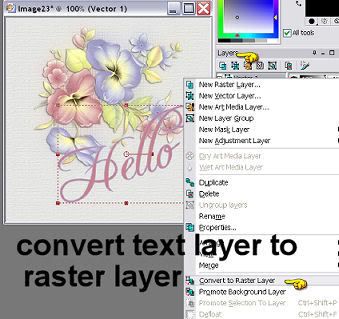
When your happy with the text.. go to the layer palette and convert to raster.
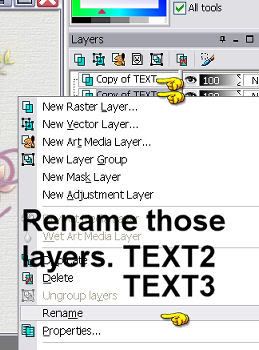
When you have converted the layer, right click on your mouse and rename that layer to "TEXT".
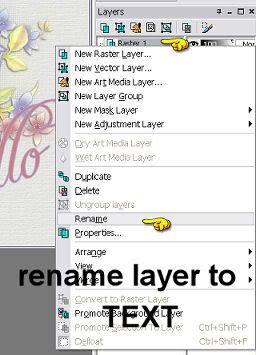
You can now duplicate that layer. 2 x's. For a total of 3 TEXT LAYERS.
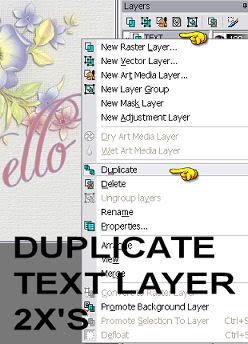
Rename the layers.. TEXT 2.. TEXT 3
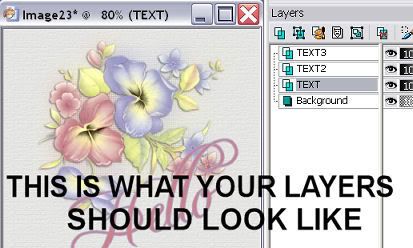
This is what it should look like in your layer palette.
With "TEXT" highlighted..... go to "adjust"... add noise.
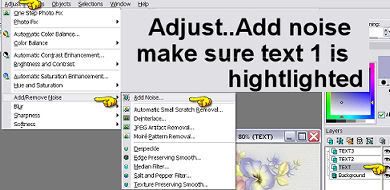
ADD noise on your first text layer.
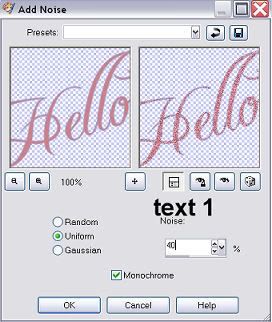
Those are the settings I used, but you can play around to find one you like. The higher the number the more noise added.
Highlight "TEXT 2" layer.
Adjust... add noise....change the amount to a higher number.
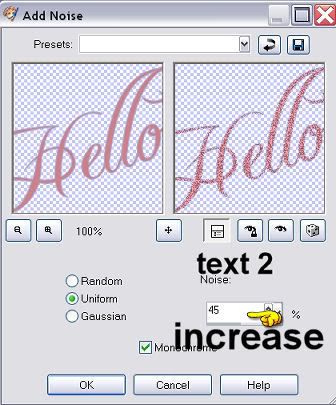
Highlight "TEXT 3"layer.
Adjust.... add noise... change the amount to a higher number.
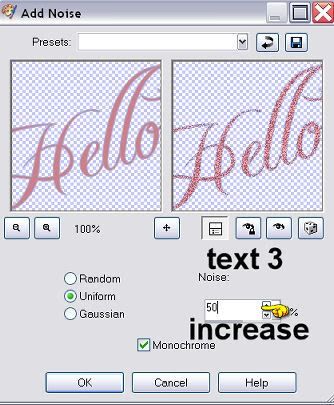
Now that noise is applied on all layers of the text.
X out the lil eye on the layer palette beside "text 2 and text 3".
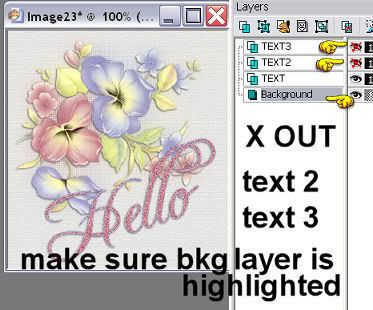
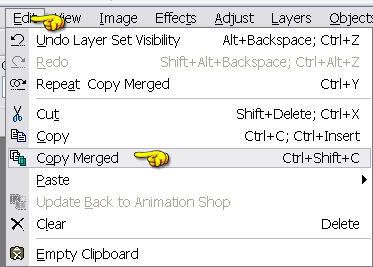
Go to EDIT... COPY MERGED.
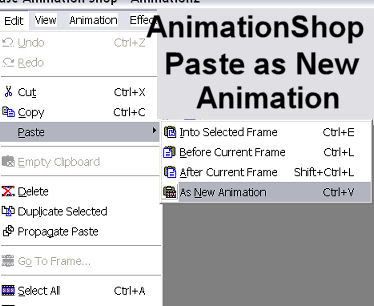
Over to animation shop.
Edit.... paste. paste as a new animation.
Back to PSP.
X out "TEXT and TEXT 3"layers.
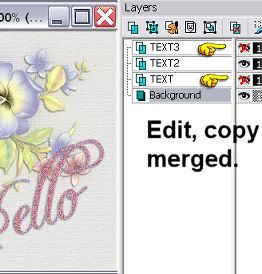
EDIT.... COPY MERGED.
Back to Animation Shop....EDIT.. PASTE.. PASTE AFTER CURRENT FRAME.
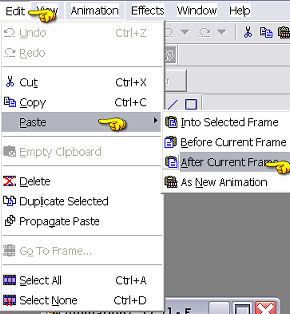
Back to PSP.
X out "TEXT and TEXT 2" layers.
EDIT.... COPY MERGED.
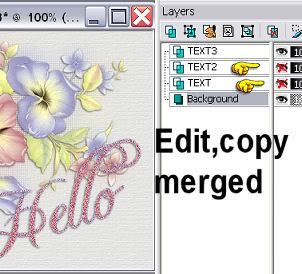
In Animation Shop, EDIT. PASTE...PASTE AFTER CURRENT FRAME.
You should now have 3 FRAMES in Animation shop.
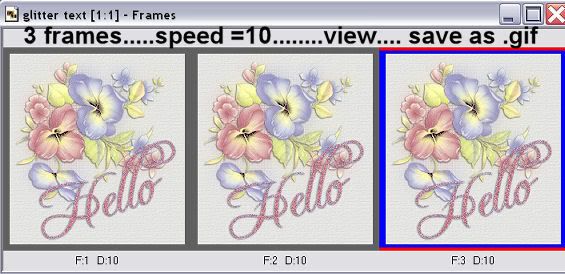
Click on View animation.If you like the animation, save as a .gif.
Your finished!

Open PSP and Animation Shop.
Begin with an ready made image or make one which ever you prefer.
I made my image, then merged flat.
It shows on the layer palette as "background".

Pick your colors and font for the text.
Apply the text as a vector layer.

I like vector layers, because I can move them around, stretch them etc... and place them were I want before converting to a raster.
When your happy with the text.. go to the layer palette and convert to raster.

When you have converted the layer, right click on your mouse and rename that layer to "TEXT".

You can now duplicate that layer. 2 x's. For a total of 3 TEXT LAYERS.

Rename the layers.. TEXT 2.. TEXT 3

This is what it should look like in your layer palette.

With "TEXT" highlighted..... go to "adjust"... add noise.

ADD noise on your first text layer.

Those are the settings I used, but you can play around to find one you like. The higher the number the more noise added.
Highlight "TEXT 2" layer.
Adjust... add noise....change the amount to a higher number.

Highlight "TEXT 3"layer.
Adjust.... add noise... change the amount to a higher number.

Now that noise is applied on all layers of the text.
X out the lil eye on the layer palette beside "text 2 and text 3".

Go to EDIT... COPY MERGED.

Over to animation shop.
Edit.... paste. paste as a new animation.

Back to PSP.
X out "TEXT and TEXT 3"layers.

EDIT.... COPY MERGED.
Back to Animation Shop....EDIT.. PASTE.. PASTE AFTER CURRENT FRAME.

Back to PSP.
X out "TEXT and TEXT 2" layers.
EDIT.... COPY MERGED.

In Animation Shop, EDIT. PASTE...PASTE AFTER CURRENT FRAME.
You should now have 3 FRAMES in Animation shop.

Click on View animation.If you like the animation, save as a .gif.
Your finished!

Subscribe to:
Post Comments (Atom)


0 comments:
Post a Comment