Thursday, October 23, 2008
ADDING GLITTER TO A TUBE
This is a tut to show you how to add a pre-made glitter to the outside of a tube/image.
Remember it's all in the layers :o)
Understanding glitter:
Glitter is noise added to a color. Each layer has a different volume of noise.
When those layers are put together in animation shop the noise becomes what is called "glitter".
To use those glitters on a project you must open the glitter swatch in Animation shop and export the frames to PSP.
This tut will show you how to achieve those steps.
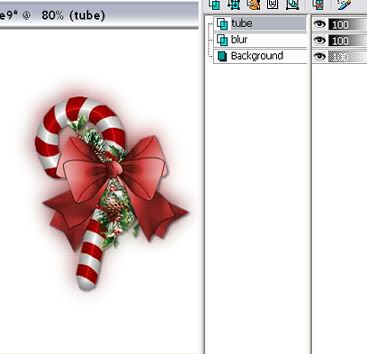
Here's my tube.
Here's the glitter I'm using:

Let's get your tube ready for glitter.
Open your tube in PSP.
Copy and paste it onto a new canvas as a new layer.
(I prefer to use a white or black canvas, because I don't like changing my animation shop preferences everytime I make an animation)
Close your original tube.
On your layer palette, rename that layer to "tube".
On your tool bar click selections--select all--selections--float--selections--defloat.
The ants will be marching all around your tube.
Selections--modify--expand--
(this number will depend on the size of the outline glitter you want. The larger the number the wider the outline you will fill with glitter)
I used expand by 8.
Keep the ants marching.
Now go over to your Animation shop
Browse to find the glitter swatch you want to use and open it.
You'll see how many frames it has, usually 3 or 4.
Now you want to bring those frames over to psp to use as your pattern fill.
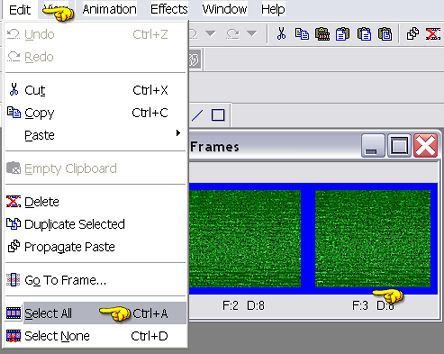
Go to EDIT--SELECT ALL ( this selects all the frames)
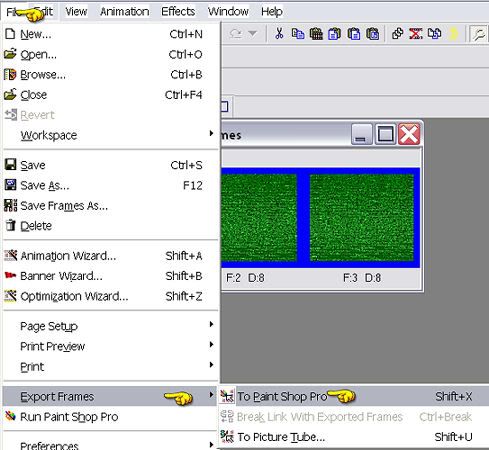
Go to FILE--EXPORT TO PAINT SHOP PRO
Now go back to PSP and you will see your glitter swatch there.
Activate it and look on your layer palette.
It will show you how many layers you will need to add onto your project.
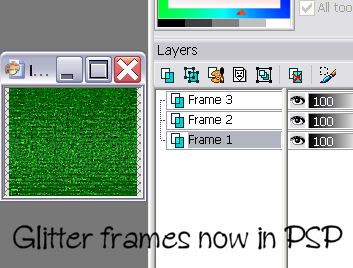
Mine has 3 frames.
This means I must add 3 new raster layers to my project.
Activate your tube project. Go to layers, add new raster layers. Do this 3 times.
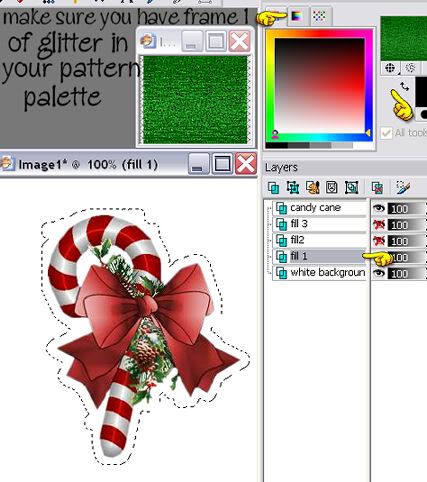
Rename those layers. fill 1--fill 2--fill 3--.
Right click on your layer palette and arrange your tube layer to bring it to the top.
This is what you should have on you layer palette.
TUBE
FILL 3
FILL 2
FILL 1
BACKGROUND or if transparent RASTER.
Activate your glitter frames you'll see the frames on your layer palette numbered already.
X out frame 2-3 and make sure you highlight frame 1.
Go to your pattern section on your color palette. Find the glitter pattern and click ok.
Activate your project.
X out fill 3-2- and highlight fill 1
Make sure fill 1 layer is highlighted.
Using your fill bucket, fill it that layer with glitter.
Activate your glitter swatch, X out frame 1--UNX frame 2
In your color palette, set the pattern again.
Activate your project.
X out fill 1 and UNX fill 2.
Fill 2 layer is highlighted on your layer palette, fill with glitter.
Activate your glitter swatch again, X out frame 2 --UNX frame 3.
In your color palette, set the pattern again.
Activate your project.
X out fill 2 and UNX fill 3.
Fill 3 layer is highlighted on your layer palette, fill with glitter.
Ok now you're ready to animate that glitter.
On your layer palette, highlight the background layer.
Xout fill 2-3 layers.
Edit--copy merged.
Over to Animation shop, EDIT--- PASTE AS A NEW ANIMATION.
Back to PSP, X OUT FILL 1 LAYER, UNX FILL 2 LAYER,
Edit---copy merged.
Over to Animation Shop, EDIT--- PASTE AFTER CURRENT FRAME.
Back to PSP, X OUT FILL 2 LAYER, UNX FILL 3 LAYER.
Edit---copy merged.
Back to Animation shop, EDIT--PASTE AFTER CURRENT FRAME.
You now have 3 frames in animation shop. Click to view.
If your happy with it, save as a .gif

Just remember to make sure you have the same amount of layers as you have frames of glitter. With glitters that have more than 3 frames, just add new raster layers to equal the same amount of frames on your project.
Hope this tut has helped you learn a bit about glittering around the outside of a tube.
Below will show you how to use your freehand/lasso tool to add glitter to a portion of a tube.
You can export the frames of glitter into PSP as shown above and use the fill in the areas you have freehand cut or you can add the glitter using noise in your PSP program.
Here's my project:
I just want to glitter the bow.
Using the freehand tool, I go around the bow from one end to the other.
Duplicate your tube layer 2x's
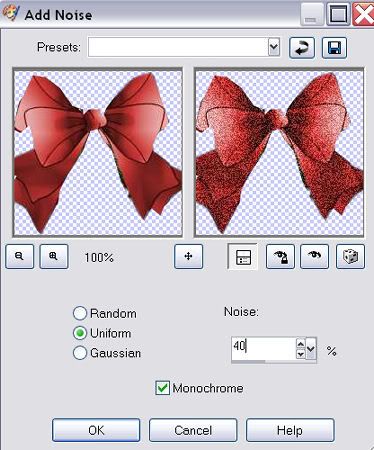
Now add the noise to each layer
1st layer noise at 40---2nd layer noise at 45---3rd layer noise at 50
Selections-- Select none.
X out layers 3 and 2. Highlight background layer.
Edit, copy merged.
Paste into animation shop as a new animation.
Go back n forth to PSP and copy merged your other 2 frames till you have 3 frames in animation shop.
View your animation, and save as a .gif.

Remember it's all in the layers :o)
Understanding glitter:
Glitter is noise added to a color. Each layer has a different volume of noise.
When those layers are put together in animation shop the noise becomes what is called "glitter".
To use those glitters on a project you must open the glitter swatch in Animation shop and export the frames to PSP.
This tut will show you how to achieve those steps.
Here's my tube.

Here's the glitter I'm using:

Let's get your tube ready for glitter.
Open your tube in PSP.
Copy and paste it onto a new canvas as a new layer.
(I prefer to use a white or black canvas, because I don't like changing my animation shop preferences everytime I make an animation)
Close your original tube.
On your layer palette, rename that layer to "tube".
On your tool bar click selections--select all--selections--float--selections--defloat.
The ants will be marching all around your tube.
Selections--modify--expand--
(this number will depend on the size of the outline glitter you want. The larger the number the wider the outline you will fill with glitter)
I used expand by 8.
Keep the ants marching.
Now go over to your Animation shop
Browse to find the glitter swatch you want to use and open it.
You'll see how many frames it has, usually 3 or 4.
Now you want to bring those frames over to psp to use as your pattern fill.
Go to EDIT--SELECT ALL ( this selects all the frames)

Go to FILE--EXPORT TO PAINT SHOP PRO

Now go back to PSP and you will see your glitter swatch there.
Activate it and look on your layer palette.
It will show you how many layers you will need to add onto your project.

Mine has 3 frames.
This means I must add 3 new raster layers to my project.
Activate your tube project. Go to layers, add new raster layers. Do this 3 times.
Rename those layers. fill 1--fill 2--fill 3--.
Right click on your layer palette and arrange your tube layer to bring it to the top.
This is what you should have on you layer palette.
TUBE
FILL 3
FILL 2
FILL 1
BACKGROUND or if transparent RASTER.
Activate your glitter frames you'll see the frames on your layer palette numbered already.
X out frame 2-3 and make sure you highlight frame 1.
Go to your pattern section on your color palette. Find the glitter pattern and click ok.

Activate your project.
X out fill 3-2- and highlight fill 1
Make sure fill 1 layer is highlighted.
Using your fill bucket, fill it that layer with glitter.
Activate your glitter swatch, X out frame 1--UNX frame 2
In your color palette, set the pattern again.
Activate your project.
X out fill 1 and UNX fill 2.
Fill 2 layer is highlighted on your layer palette, fill with glitter.
Activate your glitter swatch again, X out frame 2 --UNX frame 3.
In your color palette, set the pattern again.
Activate your project.
X out fill 2 and UNX fill 3.
Fill 3 layer is highlighted on your layer palette, fill with glitter.
Ok now you're ready to animate that glitter.
On your layer palette, highlight the background layer.
Xout fill 2-3 layers.
Edit--copy merged.
Over to Animation shop, EDIT--- PASTE AS A NEW ANIMATION.
Back to PSP, X OUT FILL 1 LAYER, UNX FILL 2 LAYER,
Edit---copy merged.
Over to Animation Shop, EDIT--- PASTE AFTER CURRENT FRAME.
Back to PSP, X OUT FILL 2 LAYER, UNX FILL 3 LAYER.
Edit---copy merged.
Back to Animation shop, EDIT--PASTE AFTER CURRENT FRAME.
You now have 3 frames in animation shop. Click to view.
If your happy with it, save as a .gif

Just remember to make sure you have the same amount of layers as you have frames of glitter. With glitters that have more than 3 frames, just add new raster layers to equal the same amount of frames on your project.
Hope this tut has helped you learn a bit about glittering around the outside of a tube.
Below will show you how to use your freehand/lasso tool to add glitter to a portion of a tube.
You can export the frames of glitter into PSP as shown above and use the fill in the areas you have freehand cut or you can add the glitter using noise in your PSP program.
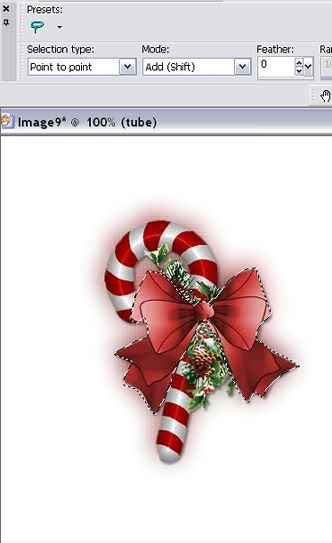
Here's my project:

I just want to glitter the bow.
Using the freehand tool, I go around the bow from one end to the other.

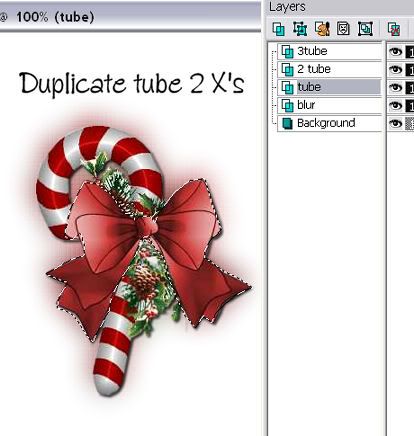
Duplicate your tube layer 2x's

Now add the noise to each layer
1st layer noise at 40---2nd layer noise at 45---3rd layer noise at 50

Selections-- Select none.
X out layers 3 and 2. Highlight background layer.
Edit, copy merged.
Paste into animation shop as a new animation.
Go back n forth to PSP and copy merged your other 2 frames till you have 3 frames in animation shop.
View your animation, and save as a .gif.

Subscribe to:
Post Comments (Atom)
♥ Click for my profile ♥

loves2pspxox@aol.com


♥Grab My Blinkie♥

♥Places I Love♥


0 comments:
Post a Comment