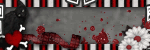
Tuesday, January 06, 2009
WORKING WITH A MASK

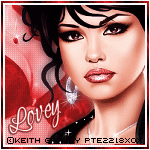
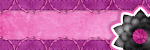
In this project I used the beautiful art of Penny Parker
Mask is unknown~if this is your mask, please contact me so I may give proper credit.
Supplies needed:
PSP and Animation Shop
Tube of choice
Mask of choice
Font
VM Natural plugin~sparkle ( optional)
Unzip and extract supply folder.
Open tube and mask in your PSP.
Minimize tube for use later. We start off with the mask.
Open a new white canvas ( image) 600 x 600. We will resize later.
Set up your colors. Pick 2 colors from your tube and put them in your color palette.
I used Deep Rose~#A94351 in my foreground, and off white ~#F6F6F6 in my background palette.
Activate your new canvas.Go to layers, add a new layer, raster layer.

Click on your fill tool and fill that new layer with color # A94351
Go to layers~add new mask layer~from IMAGE.
A box will pop up and in the drop down look for the mask that is in your workspace.
The heart mask is~nk heart1
Apply mask with settings as shown below:

Over on your layer palette you will see new layers added.

Highlight layer "mask" right click on your mouse, click delete.

Highlight layer "group" right click on your mouse, click MERGE GROUP.
Rename this layer "MASK".
Open your tube. Activate tube, go to edit, copy.
Activate your project, edit paste as a NEW LAYER.
Your tube is now on your project. Place it where you like.
Rename that layer "tube".
You now have 3 layers on your palette. White background, mask and tube.
Add your text as a vector layer. Place it where you like.
When your happy with it, right click on mouse and convert to a raster layer.
Rename that layer "TEXT".
Here is the time to add your CR info. Right click mouse, convert that layer to a raster and move DOWN under your text layer.
Highlight your text layer. We are now going to add effects to the text.

Effects~drop shadow~V=0,H= -2, opac = 65, blur = 3.00 CHECK MARK IN THE "SHADOW ON NEW LAYER".
(This will add a new layer with the drop shadow only)
Click ok.
Text layer still highlighted, go to selections~select all~~float ~selections ~defloat~selections~modify- contract 1.
The ants are marching around the text. Right click mouse on layer palette and duplicate that layer 2 x's.
Total of 3 text layers and 1 text shadow layer. We are going to work on the text only layers. Not the shadow layer.
Rename those text layers, tx 1, tx 2, tx 3.
Highlight tx 1 layer.
Go to adjust, add/remove noise, add noise with these settings.
Uniform dotted, noise @ 50, monochrome checked off.
Click ok

Tx 2 layer, highlighted, go to adjust, add noise, click the uniform dot 2 x's.
Tx 3 layer, highlighted, go to adjust, add noise, click the uniform dot 3 x's.
X out all text layers including the shadow.
We are going to work on the tube now.
Highlight your tube layer.
With your freehand tool, go around the areas in the tube you'd like to add glitter/noise.
When u have all the areas you want glittered, right click on your layer palette and PROMOTE SECTION TO A LAYER.
This puts those sections on a separate layer so we can add effects.
Ants are still marching.
Rename that promoted layer to gl 1. duplicate that layer 2 x's. Rename those layers, gl 2, gl 3.
You now have 3 layers of the sections you want to add glitter.
Highlight gl1 layer. Adjust, add noise, same settings as before, but change the amount from 50 to 33. Click ok.
Highlight gl 2 layer, add noise, click on the uniform dot 2 x's.
Highlight gl 3 layer, add noise, click on the uniform dot 3 x's.
When u have finished adding noise on those layers. go to selections, select none.
X out gl 2 and gl 3 layers.
This is what your layer palette should look like.

If you would like to add sparkles to the mask, now is the time to do it.
Duplicate your mask layer 2 x's, for a total of 3 mask layers.
Highlight mask 1~effects, plugins, VM NATURAL~SPARKLES.
Settings : Max size @ 21--- random seed @ 99 click ok.
Highlight mask 2 layer~apply the sparkles, change the random seed to 47, click ok.
Highlight mask 3 layer~apply the sparkles, change the random seed to 21, click ok.
X out Mask 2 & 3 layers.
Now it's time to put it together in Animation shop.
Highlight white background layer on your layer palette.
X out's on ~~~text #2 & #3~~ gl #2 & gl# 3~~ mask #2 & #3.
Go to edit, copy merged.
Over to Animation Shop~~ edit, paste, paste as a new animation.
Back to PSP.
X out all your #1 layers, UnX your #2 Layers.
Edit, copy merged.
Animation Shop, Edit, paste after current frame.
Back to PSP.
X out all your #2 layers, UnX your #3 layers.
Edit, copy merged.
Animation Shop, Edit, paste after current frame.
You now have 3 frames in animation shop. You can resize now if you want.
Click to view animation.
If you're happy with it, save as a .gif.
:o)
Subscribe to:
Post Comments (Atom)
♥ Click for my profile ♥
loves2pspxox@aol.com


♥Grab My Blinkie♥

♥Places I Love♥


0 comments:
Post a Comment