♥ Labels ♥
- Tutorials (36)
- Animations (29)
- St Patricks Day (6)
- Templates (5)
- Valentines (4)
- Easter (3)
♥Chit Chat♥
♥Favorite Scraps♥
♥PSP Stuff♥
Saturday, January 31, 2009
Forever Love

This tut is dedicated to Shae and Nikki.
Thanks for your support and inspiration to continue writing these tuts.
For this project I used the fantastic art of Marjolein Gulinski.
This is licensed art.
Please do not use this art without a license and purchase.
You can see and purchase Marjolein's work at:
Supplies needed are:
Tube of choice
Mask of choice
Paper or color layer of choice.
Font of choice.
EyeCandy3-HSB Noise,EyeCandy5Impact MotionTrail and
Xenofex-constellation.
And I used EC4000 for a corona glow ( optional)
Open your tubes in PSP.Open a new white image 550x550.
Copy and paste your paper on as a new layer.
Go to layers,add mask from disk.Find the mask you'd like and apply.
On your layers palette, hightlight mask layer, and delete.
Nighlight group, right click on mouse, merge group.
Rename that layer mask.
Now we are going to make the lil hearts that layer ontop of the mask.
In your color palette,foreground set to white or color of choice from your tube and the background box at null.
Go to your preset tool.
Find a shape in the drop down. I picked a heart.
I changed my lines to dot.
These are the settings I used.

Set on as a vector layer,apply your shape.
When you're happy with the first shape.Go to layer palette and convert to a raster.
Duplicate that layer, change the postion of the next heart and using your deform tool, rotate it a bit to the left.
Duplicate that layer, and move that heart, rotating it abit in the other direction.
Keep doing these steps till you have all the shapes in place that you like.
X out all layers but those shapes. With heart layer highlighted, merge those layers visible.
Copy and paste your tube on as a new layer.
Name it TUBE.
Add your text as a vector layer.
When your happy with it, right click on layer palette and
convert it to a raster.
Rename the layer to TEXT.
Highlight your tube layer on your layer palette.
We are going to put some effects on the tube.
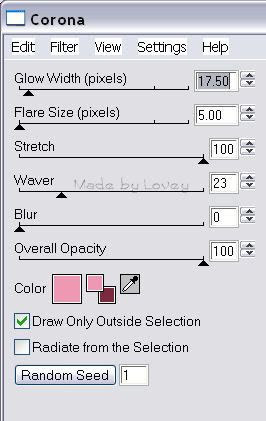
I put a glow around the fairy with EC 4000-Corona at these settings.
Next I put ECandy 5 HBS noise on the wings
Using your freehand tool, with these settings:

Go around the areas of the tube you'd like to put this effect.
Ants are marching.
On your layer palette,right click, CONVERT SECTIONS TO A LAYER.
This puts just the wings on their own layer.
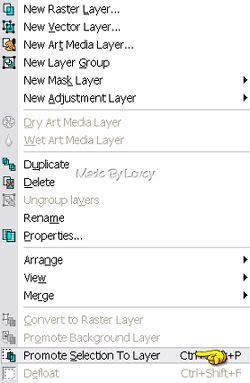
Duplicate that layer 2x's. Rename those layers, N1-N2-N3.
With N highlighted and the ants still marching
Go to effects, plugins, EC3 HBS Noise.
With these settings:
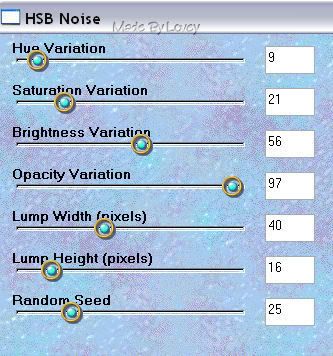
Highlight N2 layer, apply the noise again,but change the random seed to 30.
Highlight N3 layer, apply the noise again, change the random seed to 40.
Selections-Select none.
XOUT N2 & N 3 layers.
I'm going to add some glitter to the fairy's dress.
Highlight tube layer.
Using freehand tool, going around the areas I wanted glittered.
Ants are marching.
Right click on layer palette and PUT THAT SECTION ON IT'S OWN LAYER

Selections, select none.
Duplicate that layer 2x's. Rename layers gl1-gl2-gl3.
Highlight Gl1 layer, adjust, add noise @40
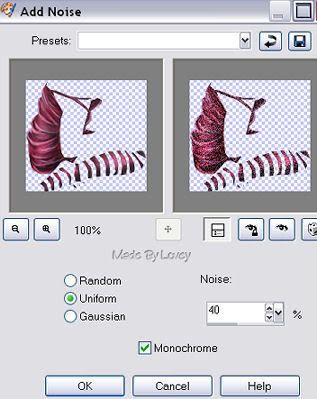
Highlight G2 layer, apply noise again, clicking the uniform button 'x's.
Highlight G3 layer, apply noise again,clicking uniform button 3x's.
XOut G2 & G3 layers.
I want to add some effects to my text.
Highlight Text layer.
Selections,select all, float, defloat,modify,contract by 1.
Ants are marching. Duplicate that layer 3X'S.
Rename layers Tx1-tx2-tx3.
You will have a total of 4 layers of text.
Highlight Tx1 layer, adjust, add noise @ 30.
Tx2 layer,adjust, add noise, click uniform button 2x's.
Tx3 layer, adjust, add noise, click unifrom button 3x's.
Selections, select none.
Back to the original text layer.
Effects, ECandyImpact- Motion Trail, with these settings:
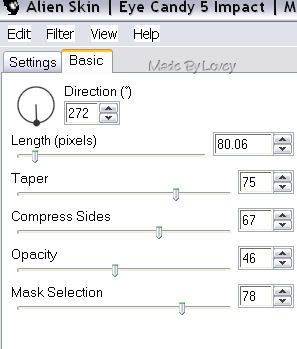
Ok we're almost finished. One more effect I want to put on is a tiny constellation on those hearts.
Highlight the shape, or heart layer.
Duplicate that layer 2x's.
Rename Con1 Con2 Con3.
Highlight Con1 layer.
Effects, xenofex-constellation with these settings:
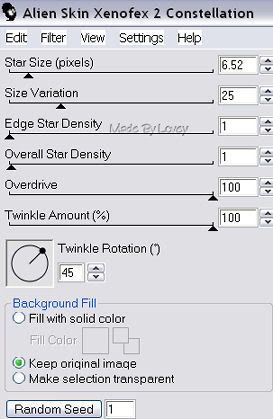
Apply the constellation.
Highlight con2 layer, apply constellation again, click once on the random seed button.
Highlight con3 layer, apply constellation again, click once on the random seed button.
Ok we're ready to put it together in Animation Shop.
This is what your layers should look like:
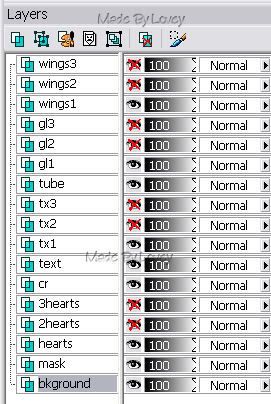
Highlight your background layer.
Edit, copy merged.
Animation Shop, edit, paste as a new animation.
PSP, UNX all #2 layers. X out all #1 layers.
Edit,copy merged.
Animation Shop, edit, paste after current layer.
Back to PSP.
UNX all #3 layers, X out all #2 layers.
Edit, copy merged.
AShop, Edit, paste after current frame.
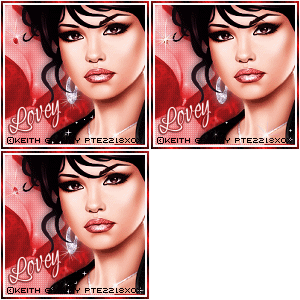
You now have 3 frames in animation shop.
Click to view and if you're happy with it, save as a .gif.
Hope you enjoyed this tutorial.
Happy PSPing!

Subscribe to:
Post Comments (Atom)


0 comments:
Post a Comment