♥ Labels ♥
- Tutorials (36)
- Animations (29)
- St Patricks Day (6)
- Templates (5)
- Valentines (4)
- Easter (3)
♥Chit Chat♥
♥Favorite Scraps♥
♥PSP Stuff♥
Monday, January 12, 2009
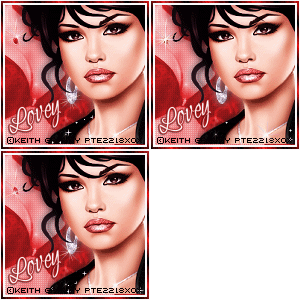
Graphic in Text

For this project I began with a transparent background.
I don't usually start with tran backs because I find when using more than 255 colors in an image, there seems to be a white outline on the glitter after it's saved.
So usually when I make a tag I begin with either white or black back to ensure there will be no faint line either white or black on the finished .gif.
I'm sorry I won't be supplying graphics for this project. I'm sure ya'll have a collection :o)
The font I used was IMPACT. You should have it in your comp already.
Open your graphic in psp.
Open a new transparent canvas. 550 x 550.
Pick your color from your graphic and put it in your foreground and background box on your color palette.
Apply your text as a vector. So you can move it and stretch it etc...
Be sure you make an adjustment in your "kerning". Kerning changes the width between letters in the text.
Set it at -25. The - brings the letters closer together.
Below is the settings I used.
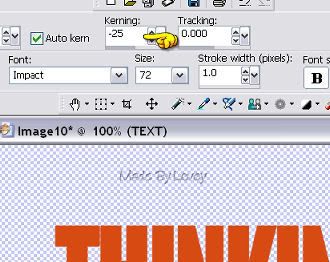
If you're happy with your text.Right click mouse on layer palette and convert to a raster.
Rename that layer TEXT.
Go to selections~~ select all~~ selections float~~ selections defloat~~Ants are marching around the text.
Activate your graphic. Edit~~ copy.
Back to your project~~ paste as a new layer.
Your marching ants are now on the graphic.
Position the graphic where it will show through in the text as you like.
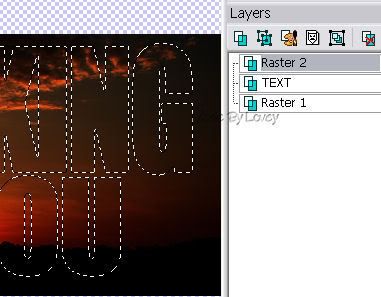
Go to selections~~ INVERT~~ hit the delete key on your keyboard.
Selections~~ select none.
Right click on your layer palette, rename that layer "gr txt".
Highlight text layer. Select~~ select all~~ float~~defloat~~ modify~~ expand by 6.
Flood fill that layer with a color from your tube.
This will be the background color to your graphic text.
Selections~~ select none.
X OUT "raster 1 layer"on your layer palette.
That's the transparent background you began with..
Highlight the "gr txt" layer on your layer palette.
Go to layers, merge visible. You have just merged the text and the textback together.
Rename that layer TEXT.
Un X raster 1.
With TEXT layer highlighted on your layer palette. Go to selections~~ select all~~ float~~ defloat~~ modify~~expand by 8.
Ants are marching.
On your layer palette, highlight the raster 1 layer.
Flood fill with another color from your graphic.
This is going to be the glitter glow around the text.
Selections~~ select none.
Rename layer glow 1.
Crop your project and resize all layers if needed.
Duplicate glow 1 layer 2x's for a total of 3.
Rename those layers, glow 2, glow 3.
Highlight glow 1 layer.
Adjust~~ add noise~~ monochrome and uniformed checked~~noise@ 65.
Highlight glow 2 layer~~ add noise~~ change noise to 70.
Highlight glow 3 layer~~ add noise~~ change noise to 75.
X OUT glow 2 & 3 layers.
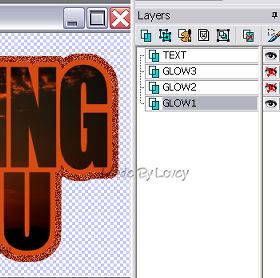
We're now ready to put it together in Animation Shop.
Edit~~copy merged.
AShop ~~ edit~~ paste as a new animation.
PSP~~ highlight and UnX glow 2 layer. X out glow 1 layer.
Edit~~copy merged.
Animation Shop~~ Edit~~ paste after current frame.
PSP~~highlight and UnX glow 3 layer. X out glow 2 layer.
Edit~~ copy merged.
Animation Shop ~~ Edit ~~ paste after current frame.
You now have 3 frames in animation shop. Resize if needed.
View animation.
Now we are working on a transparent .gif, so we'll need to make an adjustment while saving.
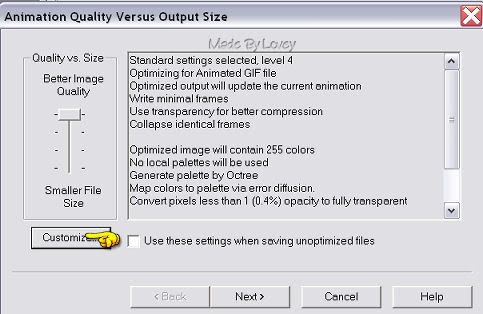
Then on the transparency tab:

Continue on saving click next etc...
You're done!!
Remember to change your settings in animation shop next time you work with a white back.
On the partial transparency tab, check off Yes,blend with this color and put white in the color box.
Happy PSPing!! :o)
Subscribe to:
Post Comments (Atom)


0 comments:
Post a Comment