♥ Labels ♥
- Tutorials (36)
- Animations (29)
- St Patricks Day (6)
- Templates (5)
- Valentines (4)
- Easter (3)
♥Chit Chat♥
♥Favorite Scraps♥
♥PSP Stuff♥
Monday, January 26, 2009
Making a Swinger

For this project I used pieces of a kit from Monti's Playground.
You can find it in Monti's kits called Cream & Gold.
Here's supplies of accent swingers that I have collected over the years. Please keep all the file names intact.
The font I used is Conventry Garden.
Let's get started. Open a new canvas 450x450 white or black.
I used black.
Open your supplies in PSP.
On your color palette,forground..click to patterns and find your gold pattern.
Background box on palette on nil.
Text size 100,stroke 3, apply text as a vector.
I used a capital for the H and the other letters are regs.
Postion the text as you like, then right click on layer palette and convert it to a raster.
Rename this layer gold.
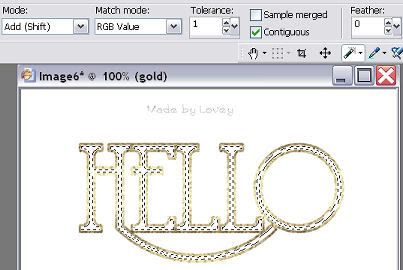
With your magic wand,click inside the letters till all letters have ants marching around.

Copy and paste your paper on as a new layer.
Place it over the gold layer.
Highlight gold layer on your layer palette.
Selections--modify--expand by 2--selections invert--
highlight the paper layer, hit delete on your keyboard.
Selections, select none.
On your layer palette, right click and arrange the paper layer under the gold layer.
Highlight the gold layer.
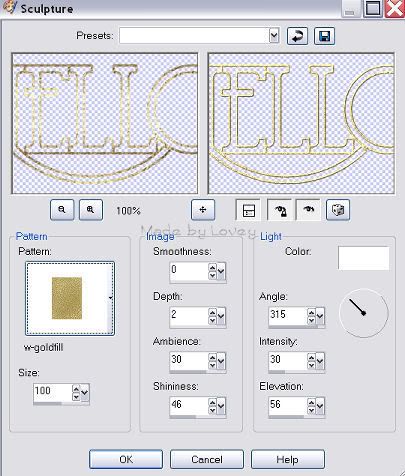
Effects--sculpture--find the gold pattern in the box and apply these settings.

Click ok.
Go to adjust--sharpen--adjust--add noise @ 65.
Copy and paste your swinger tube onto your text as a new layer. Place where you want it to swing.
Rename this layer charm 1.
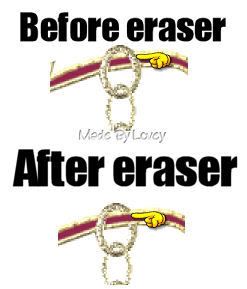
With your eraser tool,erase part of the link that is on the text, so it looks like the link is wrapped around the text.
You might want to zoom in for this step so you can see it better.

My eraser is set on round, size 3.
Duplicate the charm layer 2 times.Rename charm 2 & charm 3.
Working on charm 2 layer.
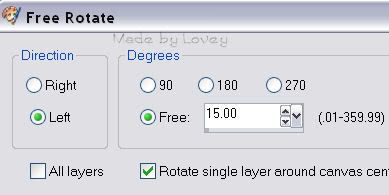
Charm 2 go to image, rotate, free rotate.
Direction right--free checked off--15.00
Make sure the checkmark is beside "rotate single layer around canvas".
Place the erased part of the chain back to the same postion as on charm 1.
We want that chain link to match up as they swing.
Highlight Charm 3 layer.
Image,rotate,free rotate.
Same settings, but change the right to left.

Move the chain link back into place on the text.
Highlight charm 1 layer--adjust--sharpen
Highlight charm 2 layer--adjust--sharpen
Highlight charm 3 layer--adjust--sharpen.
Now you can go to each layer and apply a drop shadow if you want.
Make sure you have the same shadow on all layers.
Add your tagger mark on the background layer.
We're ready to put it together in animation shop.
XOUT Charm 2 & 3 layers.
Highlight background layer.
Edit, copy merged, over to AS, paste as a new animation.
Back to PSP, X out charm 1 layer, UnX charm 2 layer.
Edit, copy merged, paste into animation shop after current frame.
PSP, UnX CHARM 1 layer,X out charm 2 layer.
Edit,copy merged, paste into AS after current frame.
PSP, UnX charm 3 layer, X out charm 1 layer.
Edit, copy merged, paste into AS after current frame.
You now have 4 frames in animation shop.
Charm 1-Charm 2-Charm 1-Charm 3.
Go to edit, select all, Animation,frame properties and change the speed to 18.
Click on view, if you like it, save as a .gif.
Happy PSPing!!
Subscribe to:
Post Comments (Atom)


0 comments:
Post a Comment